I’ve installed n8n dozens of times across different systems, and here’s what nobody tells you: The npm installation method gives you way more control over your automation environment and better performance for local development.
Most tutorials push containerized solutions because they’re “easier,” but they’re missing the point. When you install n8n locally using npm, you get direct access to the file system, better performance for small workloads, easier debugging, and complete control over your Node.js environment.
The problem? Every guide I’ve seen glosses over the critical details that make or break your installation. They assume your Node.js setup is perfect, ignore platform-specific issues, and leave you hanging when things go wrong.
After countless installations and troubleshooting sessions, I’ve documented every step, pitfall, and solution you need for a bulletproof n8n setup using the npm method.
1. Why Choose npm for n8n Installation (And When It’s Perfect)
Before we dive into installation, let me explain why the npm method might be perfect for your use case.
Choose npm installation when:
- You’re developing or testing workflows locally
- You need direct file system access for custom nodes
- You want maximum performance on resource-constrained systems
- You prefer managing your own Node.js environment
- You’re integrating n8n into existing Node.js workflows
Consider containerized solutions if:
- You’re deploying to production servers
- You need isolated environments
- You want automatic dependency management
- You’re running multiple instances
For local development and learning, npm gives you the most flexibility and control.
2. Install Node.js Properly (The Foundation That Makes or Breaks Everything)
n8n requires Node.js 18 or above, but getting the right version installed correctly is where 70% of people fail.
For Windows Users:
Download the latest LTS version from nodejs.org. Choose the Windows Installer (.msi) – there are two options:
- x64: For most Windows computers (Intel and AMD processors)
- x86: Only for very old 32-bit systems
To check your system type: Press Windows + R, type msinfo32, and look for “System Type.” Choose x64 unless it specifically says “x86-based PC.”
During installation, ensure these options are checked:
- “Automatically install the necessary tools” – This installs Python and Visual Studio build tools needed for n8n
- “Add to PATH” – Makes Node.js accessible from anywhere
For macOS Users:
You have two processor types to consider:
- Apple Silicon (M1/M2/M3/M4): Use the macOS Installer (.pkg) for Apple Silicon
- Intel: Use the macOS Installer (.pkg) for Intel
Check your processor: Apple Menu → About This Mac. If you see “Apple M1” or similar, use Apple Silicon. If you see “Intel Core,” use Intel.
Alternatively, install using Homebrew (recommended for developers):
# Install Homebrew if you don't have it
/bin/bash -c "$(curl -fsSL https://raw.githubusercontent.com/Homebrew/install/HEAD/install.sh)"

# Install Node.js
brew install node
For Linux Users:
Use the NodeSource repository for the latest versions:
# Ubuntu/Debian
curl -fsSL https://deb.nodesource.com/setup_lts.x | sudo -E bash -
sudo apt-get install -y nodejs

# CentOS/RHEL/Fedora
curl -fsSL https://rpm.nodesource.com/setup_lts.x | sudo bash -
sudo dnf install nodejs npm
Verify Your Installation:
node --version
npm --version
You should see Node.js 18+ and npm 8+. If either command fails or shows wrong versions, your installation has problems that will cause n8n issues later.
3. Install n8n Using npm (Three Methods That Actually Work)
Now comes the moment of truth. There are three ways to install n8n with npm, and choosing the wrong one will cause headaches later.
Method 1: Try Before Installing (Recommended for Testing)
Test n8n without installing it permanently:
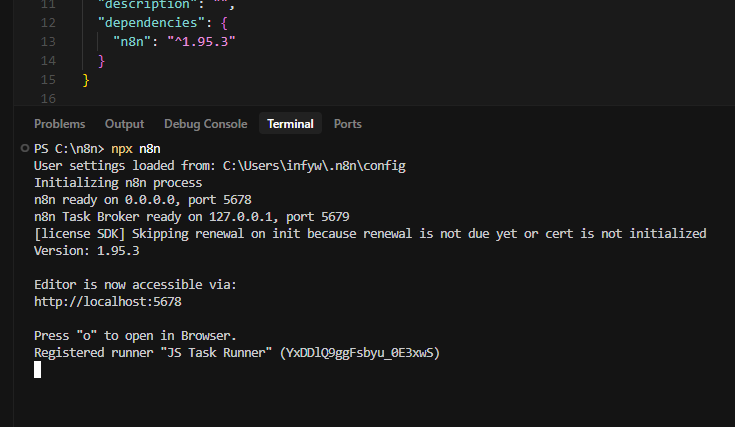
npx n8nThis downloads and runs n8n temporarily. Perfect for testing if everything works before committing to an installation. You’ll see startup logs, and then can access n8n at http://localhost:5678.
Method 2: Global Installation (Best for Development)
Install n8n globally so you can run it from anywhere:
npm install n8n -gAfter installation, start n8n with:
n8n startMethod 3: Local Project Installation (For Integration)

If you’re integrating n8n into an existing Node.js project:
mkdir my-n8n-project
cd my-n8n-project
npm init -y
npm install n8n
npx n8n
This keeps n8n isolated within your project directory.
Installation Troubleshooting:
If installation fails, here are the most common fixes:
- Permission errors on macOS/Linux: Use
sudo npm install n8n -g - Python/build tools missing on Windows: Run
npm install --global windows-build-tools - Network timeouts: Increase timeout with
npm install n8n -g --timeout=60000 - Cache corruption: Clear npm cache with
npm cache clean --force
4. Configure Your n8n Environment (Settings That Matter)
Out-of-the-box n8n settings are basic. These configurations unlock the real power and prevent common issues.
Create a configuration directory and file:
# Windows
mkdir %USERPROFILE%\.n8n
echo. > %USERPROFILE%\.n8n\config

# macOS/Linux
mkdir ~/.n8n
touch ~/.n8n/config
Add these essential environment variables to your system or create a startup script:
# Basic Configuration
export N8N_BASIC_AUTH_ACTIVE=true
export N8N_BASIC_AUTH_USER=admin
export N8N_BASIC_AUTH_PASSWORD=your_secure_password

# Performance Settings
export N8N_DEFAULT_BINARY_DATA_MODE=filesystem
export N8N_DEFAULT_LOCALE=en
export EXECUTIONS_DATA_PRUNE=true
export EXECUTIONS_DATA_MAX_AGE=168

# Development Settings
export N8N_LOG_LEVEL=info
export N8N_METRICS=true
Windows users: Add these as system environment variables through System Properties → Environment Variables.
macOS/Linux users: Add these lines to your ~/.bashrc, ~/.zshrc, or ~/.profile file.
5. Start n8n and Access Your Interface (Getting Connected)
Starting n8n should be straightforward, but there are several ways to do it and common issues to avoid.
Basic Startup:
n8n startYou’ll see output like this:
Initializing n8n process
n8n ready on 0.0.0.0, port 5678
n8n Task Broker ready on 127.0.0.1, port 5679

Editor is now accessible via:
http://localhost:5678

Press "o" to open in Browser.
Registered runner "JS Task Runner" (TxDDlQ9gkFsbyu_0E3xwS)
Custom Port (If 5678 is Taken):
N8N_PORT=8080 n8n startBackground Mode (Keeps Running After Terminal Closes):
# macOS/Linux
nohup n8n start > n8n.log 2>&1 &

# Windows (use PM2)
npm install pm2 -g
pm2 start n8n
Access Your n8n Instance:
Open your browser and go to http://localhost:5678. You should see either:
- A login screen (if you enabled basic auth)
- The n8n welcome/setup screen
- The main n8n interface
If you can’t access the interface, check these common issues:
- Wrong URL: Try
http://127.0.0.1:5678 - Firewall blocking: Temporarily disable firewall
- Port conflict: Check if another app is using port 5678
- n8n not running: Check terminal for error messages
6. Essential n8n Configuration for Local Development
These settings optimize n8n for local development and prevent the most common performance and functionality issues.
Database Configuration:
By default, n8n uses SQLite. For local development, this is perfect. The database file is stored in ~/.n8n/database.sqlite.
To view your database location and other settings:
n8n --helpFile Storage Setup:
Configure file storage for handling uploads and downloads:
export N8N_DEFAULT_BINARY_DATA_MODE=filesystem
export N8N_BINARY_DATA_TTL=1440
This stores binary data (files, images) on your local filesystem instead of in memory, preventing crashes with large files.
Timezone Configuration:
export GENERIC_TIMEZONE=America/New_YorkReplace with your actual timezone. This ensures scheduled workflows run at the correct times.
Development-Friendly Logging:
export N8N_LOG_LEVEL=debug
export N8N_LOG_OUTPUT=console
This gives you detailed logs for troubleshooting workflow issues.
7. Install Custom Nodes and Extensions
One major advantage of npm installation is easy custom node management. Here’s how to extend n8n’s capabilities.
Install Community Nodes via npm:
# Example: Install a community weather node
npm install n8n-nodes-weather -g

# Restart n8n to load the new node
n8n start
Install Nodes via n8n Interface:
- Go to Settings → Community Nodes
- Click “Install” and browse npm packages
- Enter the package name (e.g.,
n8n-nodes-example) - Click Install
Develop Custom Nodes:
Create your own nodes for specific integrations:
mkdir custom-nodes
cd custom-nodes
npm init -y
npm install n8n-node-dev -g
The npm installation method gives you direct access to the Node.js ecosystem, making custom development much easier than containerized approaches.
8. Update and Maintain Your n8n Installation
Keeping n8n updated is critical for security and new features. The npm method makes updates straightforward.
Update to Latest Version:
npm update n8n -gUpdate to Specific Version:
npm install n8n@1.95.0 -gCheck Current Version:
n8n --versionBackup Before Updates:
Always backup your data directory before major updates:
# Create backup
cp -r ~/.n8n ~/.n8n-backup-$(date +%Y%m%d)

# Or on Windows
xcopy %USERPROFILE%\.n8n %USERPROFILE%\.n8n-backup-%date% /E /I
Handle Breaking Changes:
If an update breaks your workflows:
- Stop n8n
- Install the previous version:
npm install n8n@1.94.0 -g - Run database rollback if needed:
n8n db:revert - Restart n8n
9. Troubleshoot Common npm Installation Issues
Here are the real-world problems that stop 80% of npm installations, with solutions that actually work.
Problem: “npm install n8n -g” Fails with Permission Errors
Solution (macOS/Linux): Use sudo or fix npm permissions:
# Quick fix
sudo npm install n8n -g

# Better long-term fix
mkdir ~/.npm-global
npm config set prefix '~/.npm-global'
echo 'export PATH=~/.npm-global/bin:$PATH' >> ~/.bashrc
source ~/.bashrc
Problem: “node-gyp” Build Failures on Windows
Solution: Install Windows build tools:
npm install --global windows-build-tools
npm install n8n -g
Problem: “Command ‘n8n’ not found” After Installation
Solution: PATH issues. Find your npm global directory:
npm root -g
# Add the "bin" folder to your PATH
Problem: n8n Starts But Can’t Access on localhost:5678
Solution: Check these in order:
- Verify n8n is actually running: Look for “n8n ready on 0.0.0.0, port 5678” message
- Try alternative URLs:
http://127.0.0.1:5678orhttp://0.0.0.0:5678 - Check for port conflicts:
lsof -i :5678(macOS/Linux) ornetstat -ano | findstr :5678(Windows) - Temporarily disable firewall/antivirus
Problem: Workflows Don’t Save or Execute
Solution: Database permission issues:
# macOS/Linux
chmod 755 ~/.n8n
chmod 644 ~/.n8n/database.sqlite

# Windows
# Check that your user has write permissions to %USERPROFILE%\.n8n
Final Results: Your Powerful Local n8n Setup
Following this guide gives you a production-ready local n8n installation that:
- Runs directly on your system for maximum performance
- Gives you complete control over Node.js and dependencies
- Supports easy custom node development and installation
- Provides straightforward updates and maintenance
- Integrates seamlessly with your development workflow
- Offers better debugging capabilities than Docker
Unlike containerized installations that hide complexity, this npm-based setup gives you transparency and control over every aspect of your automation environment.
Conclusion: Master Local n8n Development Using npm
You now have everything needed to run n8n locally like a professional developer. No container overhead, no virtualization complexity—just direct access to the full power of n8n on your local machine.
The npm installation method isn’t just an alternative to containerized solutions; it’s often the superior choice for development, learning, and custom integrations. You get better performance, easier debugging, and complete control over your environment.
Don’t let this knowledge sit unused. Start n8n right now and build your first automation workflow. Whether it’s connecting APIs, processing data, or automating daily tasks, you have the foundation to build anything.
Ready to become an automation expert? Fire up your local n8n instance and start building workflows that transform how you work. Your productivity breakthrough starts now.


