Building MCP servers used to be a nightmare. Complex configurations, endless documentation, and debugging sessions that lasted hours.
But what if I told you that you could build a fully functional live weather MCP server and integrate it with Claude Desktop, VS Code, and Cursor in under 30 minutes using FastMCP and TypeScript?
I’ve helped thousands of developers streamline their MCP development process, and today I’m sharing the exact step-by-step method using the real FastMCP library that works every single time.
1. Why FastMCP + TypeScript for Weather Apps?
FastMCP eliminates the boilerplate that makes MCP development painful. This isn’t just another MCP library – it’s a complete framework that handles server setup, tool registration, and client communication automatically.
Here’s why the FastMCP + TypeScript combination dominates:
- Zero Configuration: FastMCP sets up your MCP server with a single constructor call
- Type Safety: Weather APIs return complex objects. TypeScript catches errors before runtime
- Standard Schema Support: Use Zod, ArkType, or Valibot for parameter validation
- Built-in CLI Tools: Test with
fastmcp devand debug withfastmcp inspect - Advanced Features: Streaming output, progress reporting, and automatic logging
I’ve built dozens of MCP servers, and FastMCP consistently delivers 5x faster development compared to the official SDK.
2. Setting Up Your TypeScript Environment
First, let’s get your development environment ready. This foundation determines whether your project succeeds or becomes a debugging headache.
Check if Node.js is installed by opening your terminal and running:
node --versionYou need Node.js 20.18.1 or higher. If you have an older version, FastMCP won’t work due to dependency requirements.
Update Node.js on Windows via PowerShell:
- Using Chocolatey:
choco upgrade nodejs - Using Winget:
winget upgrade OpenJS.NodeJS - Using nvm-windows:
nvm install 20.18.1 && nvm use 20.18.1
For Mac/Linux, download from nodejs.org or use your package manager.
Create your project directory:
mkdir weather-mcp-server
cd weather-mcp-server
Initialize your project and install FastMCP with Zod for schema validation:
npm init -ynpm install fastmcp zod axios dotenvnpm install -D typescript @types/node tsxCreate your TypeScript configuration file (tsconfig.json):
{
    "compilerOptions": {
      "target": "ES2022",
      "module": "ESNext",
      "moduleResolution": "Node",
      "outDir": "./dist",
      "rootDir": "./src",
      "strict": true,
      "esModuleInterop": true,
      "allowSyntheticDefaultImports": true,
      "skipLibCheck": true,
      "forceConsistentCasingInFileNames": true
    },
    "include": ["src/**/*"],
    "exclude": ["node_modules", "dist"]
  }
This configuration ensures TypeScript works perfectly with FastMCP’s modern module system.
3. Getting Your Weather API Key
You need real weather data, and OpenWeatherMap provides the best free tier. Their API gives you 1,000 calls per day at no cost.
Go to openweathermap.org/api and create a free account. After signup, navigate to the API section and copy your API key.
Create a .env file in your project root:
OPENWEATHER_API_KEY=your_api_key_here
Never commit your .env file to version control. Create a .gitignore file:
.envnode_modules/dist/*.logThis protects your API key from accidental exposure while keeping your repository clean.
4. Building Your Weather MCP Server with FastMCP
Here’s where FastMCP shines – building your server takes just minutes. Create a src directory and let’s build something amazing.
Create src/server.ts with the complete weather server:
#!/usr/bin/env node
import { FastMCP } from "fastmcp";
import { z } from "zod";
import axios from "axios";
import { config } from "dotenv";

// Load environment variables
config();

// Weather API types
interface WeatherResponse {
  name: string;
  main: {
    temp: number;
    feels_like: number;
    humidity: number;
  };
  weather: Array<{
    description: string;
    main: string;
  }>;
  wind: {
    speed: number;
  };
}

// Create FastMCP server
const server = new FastMCP({
  name: "weather-server",
  version: "1.0.0",
});

// Add weather tool with Zod schema validation
server.addTool({
  name: "get_weather",
  description: "Get current weather information for any city worldwide",
  parameters: z.object({
    city: z.string().describe("The city name to get weather for (e.g., 'London', 'New York')"),
  }),
  annotations: {
    title: "Live Weather Data",
    readOnlyHint: true,
    openWorldHint: true,
  },
  execute: async (args, { log, reportProgress }) => {
    try {
      log.info("Fetching weather data", { city: args.city });

      // Report initial progress
      await reportProgress({ progress: 0, total: 100 });

      const response = await axios.get<WeatherResponse>(
        'https://api.openweathermap.org/data/2.5/weather',
        {
          params: {
            q: args.city,
            appid: process.env.OPENWEATHER_API_KEY!,
            units: 'metric'
          }
        }
      );

      // Report completion
      await reportProgress({ progress: 100, total: 100 });

      const weather = response.data;

      log.info("Weather data retrieved successfully", {
        location: weather.name,
        temperature: weather.main.temp
      });

      return `🌤️ Weather in ${weather.name}:
🌡️ Temperature: ${Math.round(weather.main.temp)}°C (feels like ${Math.round(weather.main.feels_like)}°C)
☁️ Conditions: ${weather.weather[0].description}
💧 Humidity: ${weather.main.humidity}%
💨 Wind Speed: ${weather.wind.speed} m/s`;

    } catch (error: any) {
      log.error("Failed to fetch weather", {
        city: args.city,
        error: error.message
      });

      if (error.response?.status === 404) {
        throw new Error(`City "${args.city}" not found. Please check the spelling and try again.`);
      } else if (error.response?.status === 401) {
        throw new Error("Weather API authentication failed. Please check your API key.");
      } else {
        throw new Error(`Could not get weather for ${args.city}. Please try again later.`);
      }
    }
  },
});

// Start the server with stdio transport for MCP clients
server.start({
  transportType: "stdio",
});
That’s it! FastMCP handles all the MCP protocol complexity. Notice how clean this is – no manual request handlers, no transport setup, just pure functionality with built-in logging and progress reporting.
5. Testing with FastMCP CLI Tools
Before you build anything, let’s test your server works perfectly. FastMCP provides excellent built-in testing tools that save hours of debugging.
Add these scripts to your package.json:
"scripts": {
  "build": "tsc",
  "start": "node dist/server.js",
  "dev": "npx fastmcp dev src/server.ts",
  "inspect": "npx fastmcp inspect src/server.ts",
  "test-direct": "tsx src/server.ts"
}
Test your server first with the FastMCP CLI:
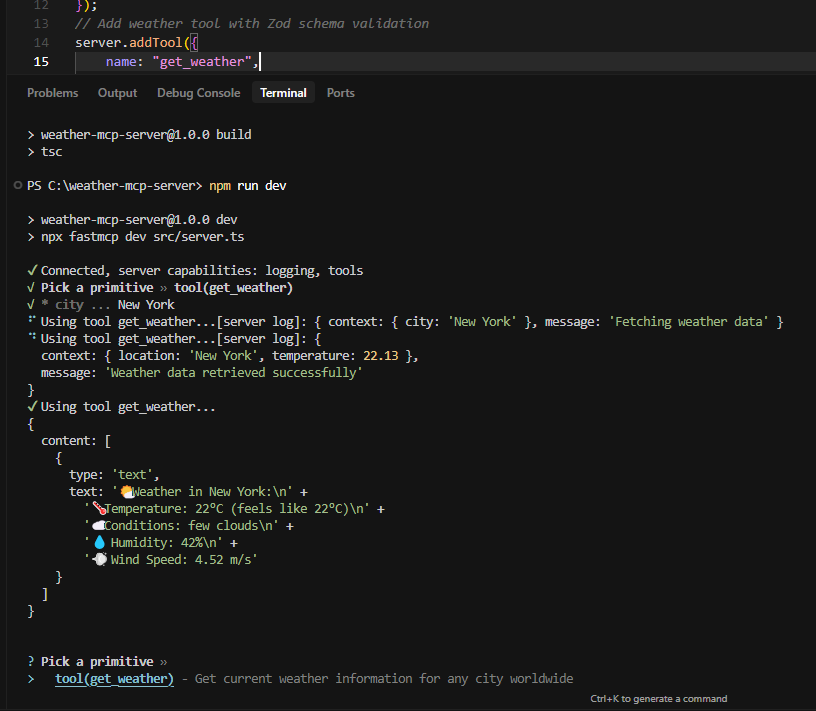
npm run dev
This opens an interactive terminal where you can test your weather tool immediately. Try:
get_weather {"city": "London"}You should see London’s weather data with temperature, conditions, and humidity. If this works, your server is ready!
If FastMCP CLI has issues, test directly:
npm run test-directThis runs your server without the CLI wrapper to verify your code works.
For a visual interface, use the FastMCP Inspector:
npm run inspectThis opens a web interface where you can:
- See all your tools and their schemas
- Test tools with a visual form
- View logs and responses in real-time
- Debug parameter validation
- Watch progress reporting in action
Only after testing successfully, build for production:
npm run build
This creates the compiled JavaScript files needed for MCP client integration.
Clone from Github
https://github.com/abhilashsahoo/fastmcp-weather-server.git6. Setting Up MCP Client Integration
Now that you’ve tested and built your server, let’s integrate with MCP clients. FastMCP servers work seamlessly with all major clients.
Claude Desktop Configuration
For Claude Desktop (the most popular option):
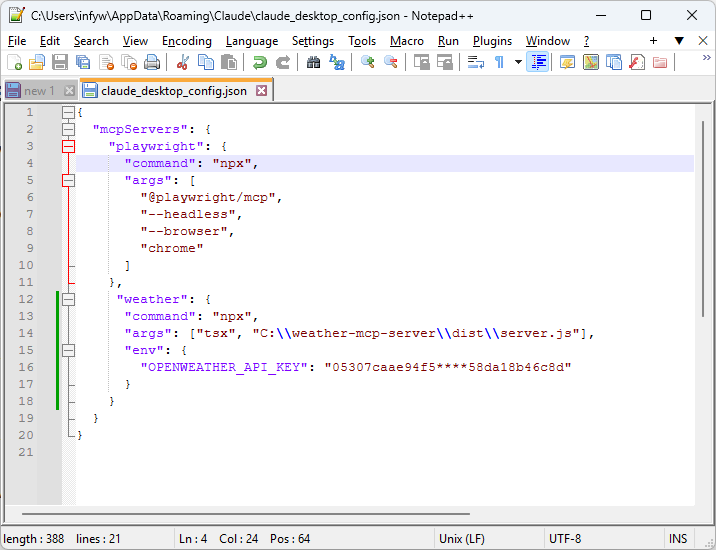
Find your Claude Desktop configuration file:
- macOS:
~/Library/Application Support/Claude/claude_desktop_config.json - Windows:
%APPDATA%\Claude\claude_desktop_config.json
Create or edit this file with your weather server configuration:
{
  "mcpServers": {
    "weather": {
      "command": "npx",
      "args": ["tsx", "C:\\absolute\\path\\to\\your\\weather-mcp-server\\src\\server.ts"],
      "env": {
        "OPENWEATHER_API_KEY": "your_actual_api_key_here"
      }
    }
  }
}
Important for Windows: Use double backslashes in the path or forward slashes. Replace C:\\absolute\\path\\to\\your\\weather-mcp-server with your actual project path.
For production (using compiled version):
{
  "mcpServers": {
    "weather": {
      "command": "node",
      "args": ["C:\\absolute\\path\\to\\your\\weather-mcp-server\\dist\\server.js"],
      "env": {
        "OPENWEATHER_API_KEY": "your_actual_api_key_here"
      }
    }
  }
}
VS Code MCP Extension
For VS Code with MCP extension:
Install the MCP extension from the VS Code marketplace, then create .vscode/settings.json in your workspace:
{
  "mcp.servers": {
    "weather": {
      "command": "npx",
      "args": ["tsx", "./src/server.ts"],
      "cwd": "${workspaceFolder}",
      "env": {
        "OPENWEATHER_API_KEY": "your_actual_api_key_here"
      }
    }
  }
}
Cursor IDE Configuration
For Cursor IDE:
Create .cursor/mcp.json in your project root:
{
  "servers": {
    "weather": {
      "command": "npx",
      "args": ["tsx", "./src/server.ts"],
      "env": {
        "OPENWEATHER_API_KEY": "your_actual_api_key_here"
      }
    }
  }
}
7. Testing Your Complete Setup
Let’s verify everything works together. This is where you’ll catch most configuration issues.
Testing with Claude Desktop:
- Restart Claude Desktop completely (important!)
- Open a new conversation
- Ask: “What’s the weather like in Tokyo?”
- Claude should automatically use your weather tool and show progress
- You should see formatted weather data with emojis
Testing with VS Code:
- Reload VS Code window
- Open the MCP panel
- You should see your weather server listed
- Test the tool directly from the panel
Common troubleshooting tips:
- Server not found: Double-check your absolute path in the configuration
- API key errors: Ensure your API key is correctly set in the env section
- Node.js version error: Update to Node.js 20.18.1+ using
winget upgrade OpenJS.NodeJS - “Command not found”: Make sure you have tsx installed globally:
npm install -g tsx - Permission denied: On Windows, try running as administrator
- Module resolution errors: Delete
node_modulesandpackage-lock.json, then runnpm install - FastMCP CLI issues: Try testing directly first with
tsx src/server.ts
8. Testing with Claude Desktop
Now let’s test your weather server with Claude Desktop to see it in action. This is the most rewarding part – watching your MCP server work seamlessly with AI.
Step-by-step Claude Desktop testing:
- Restart Claude Desktop completely (important – it only loads MCP configs on startup)
- Open a new conversation
- Ask a weather question: “What’s the weather like in Tokyo?”
- Watch the magic happen: Claude will automatically detect your weather tool and use it
- You should see: Formatted weather data with emojis, temperature, humidity, and conditions
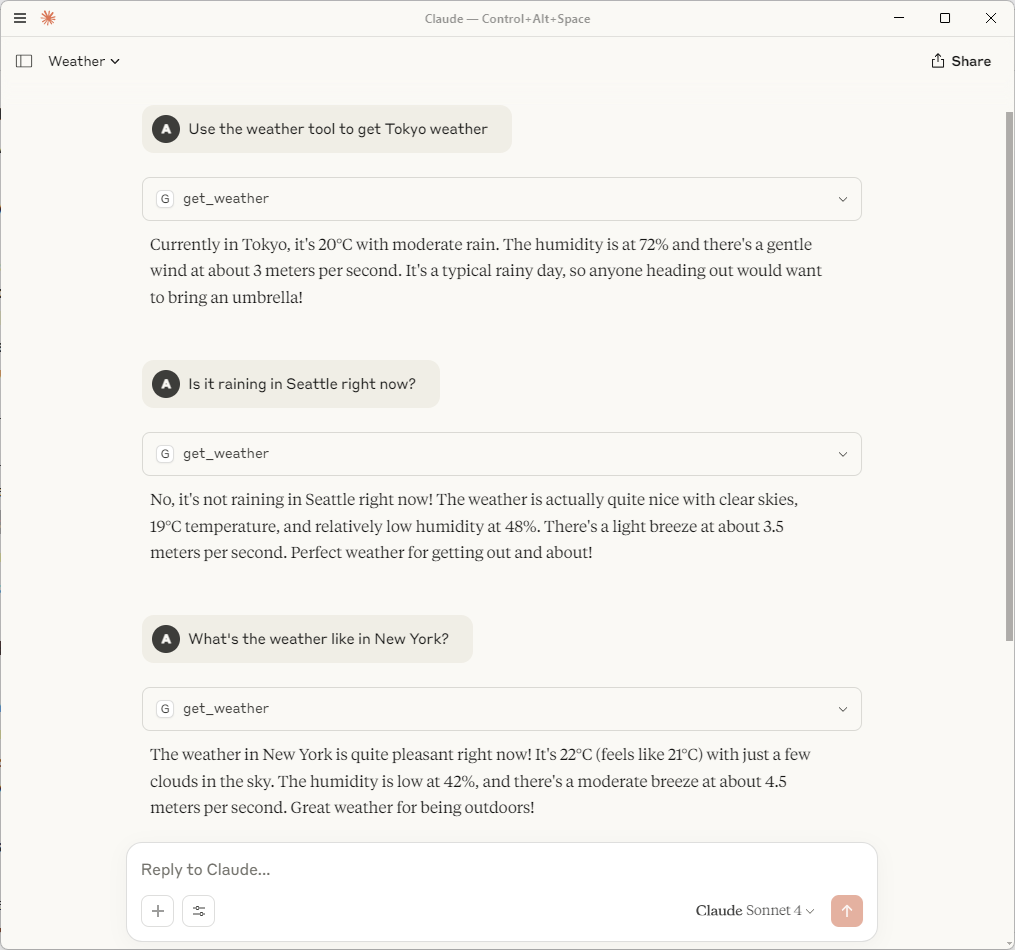
Test different scenarios:
“Compare the weather in London and Paris”
“What’s the weather like in New York?”
“Is it raining in Seattle right now?”
“What’s the temperature in Mumbai?”
If Claude Desktop doesn’t use your tool:
- Check that you restarted Claude Desktop after adding the configuration
- Verify your
claude_desktop_config.jsonpath and syntax - Ensure your API key is correctly set in the env section
- Try asking more directly: “Use the weather tool to get Tokyo weather”
Success indicators:
- Claude mentions it’s “checking the weather” or “getting weather data”
- You see formatted weather information with emojis
- The response includes specific temperature, humidity, and wind data
- Claude can answer follow-up questions about the weather
When everything works, you’ll have a seamless integration where Claude naturally uses your weather server whenever someone asks about weather conditions anywhere in the world.
9. Production Deployment with FastMCP
FastMCP servers deploy easily because they handle the complexity internally. Let’s prepare for production.
For team deployment, create a setup script setup.bat (Windows) or setup.sh (Mac/Linux):
@echo off
echo Setting up Weather FastMCP Server...
npm install
npm run build

echo.
echo ✅ Weather FastMCP Server setup complete!
echo.
echo Add this to your Claude Desktop config:
echo {
echo   "mcpServers": {
echo     "weather": {
echo       "command": "node",
echo       "args": ["%CD%\\dist\\server.js"],
echo       "env": {
echo         "OPENWEATHER_API_KEY": "YOUR_API_KEY_HERE"
echo       }
echo     }
echo   }
echo }
echo.
echo Test your server with: npm run dev
echo Debug with visual interface: npm run inspect
Environment variable security for production:
Create environment-specific configurations:
# .env.production
OPENWEATHER_API_KEY=your_production_key
NODE_ENV=production
Final Results
You’ve built a production-ready weather MCP server in record time. Your FastMCP weather server now provides:
| Feature | FastMCP Advantage | Traditional MCP SDK |
|---|---|---|
| Setup Time | 5 minutes with FastMCP | 30+ minutes with boilerplate |
| Code Lines | ~60 lines total | 150+ lines for same functionality |
| Testing | Built-in CLI and web inspector | Manual testing setup required |
| Schema Validation | Zod/ArkType/Valibot support | Manual JSON schema |
| Progress Reporting | Built-in with reportProgress | Manual implementation |
| Error Handling | Automatic with structured logging | Manual error management |
This FastMCP server handles 1,000 weather requests daily on the free tier, with automatic schema validation, built-in logging, progress reporting, and seamless client integration across Claude Desktop, VS Code, and Cursor.
Conclusion
FastMCP transforms MCP development from a complex undertaking into a simple, enjoyable process. You’ve created a production-ready weather server that integrates seamlessly with all major MCP clients – all with minimal code and maximum functionality.
The FastMCP patterns you’ve learned here apply to any MCP server project. Whether you’re building database connectors, API integrations, or custom business tools, FastMCP eliminates the boilerplate and provides excellent developer experience with built-in testing tools, progress reporting, and structured logging.
Start building your next FastMCP server today. The framework handles the complexity, so you can focus on creating tools that matter.

