The Problem: Static Website with No CMS
A client had a clean, fast static website.
Everything looked good.
But there was one missing piece.
They needed a blog.
Not just a simple page. A proper system where they could:
- Log in securely
- Add new articles
- Manage categories
- Update content anytime
Building a CMS from scratch would take time.
And honestly, it didn’t make sense.
So I looked for a smarter approach.
The Idea: Use Joomla as a Headless CMS
Instead of building something new, I used Joomla as the backend.
No frontend.
No templates.
Just content management.
Then I connected it to Next.js.
This gave me:
- A ready-to-use admin panel
- Secure authentication
- API access to content
- A fast frontend
The result was simple and powerful.
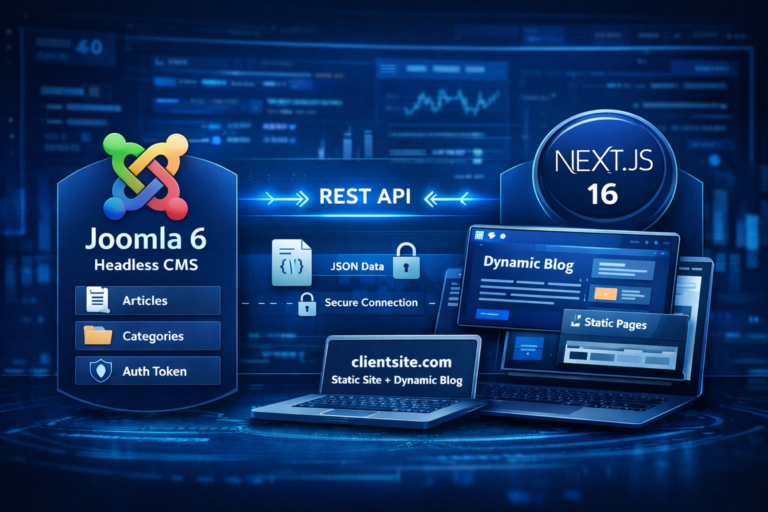
Final Architecture
Here’s what I built:
- Main website →
clientsite.comusing Next.js - Blog section →
/blog(dynamic) - Joomla backend →
joomla.clientsite.com
Joomla handles:
- Content creation
- Content storage
- API responses
Next.js handles:
- UI
- Routing
- Rendering
This separation makes everything cleaner.
Step 1: Install Joomla 6 on a Subdomain
Create a subdomain like:
joomla.clientsite.com- or
api.clientsite.com
Install a clean Joomla 6 setup.
Then simplify it:
- Disable frontend modules
- Ignore templates
- Use it only for managing content
Think of it as a backend dashboard, not a website.
Step 2: Enable Joomla Web Services API
Joomla 4+ comes with built-in Web Services.
Go to Plugins and enable:
- Web Services – Content
- API Authentication
Once enabled, your API is live.
Example endpoint:
https://joomla.clientsite.com/api/index.php/v1/content/articles
Step 3: Generate Authentication Token
Joomla supports token-based authentication.
Steps:
- Go to Users
- Open your user profile
- Generate API token
Now every API request can be secured.
Example header:
Authorization: Bearer YOUR_API_TOKEN
Step 4: Fetch Articles from Joomla API
Use the API to fetch content.
Example request:
GET https://joomla.clientsite.com/api/index.php/v1/content/articles
The response includes:
- Title
- Slug
- Content
- Categories
- Metadata
Everything needed to render a blog.
Step 5: Connect Next.js 16 (App Router)
In Next.js, I used App Router with native fetch.
Here’s a simple example:
export async function getArticles() {
  const res = await fetch(
    "https://joomla.clientsite.com/api/index.php/v1/content/articles",
    {
      headers: {
        Authorization: "Bearer YOUR_API_TOKEN",
      },
      cache: "no-store",
    }
  );

  if (!res.ok) {
    throw new Error("Failed to fetch articles");
  }

  return res.json();
}
This pulls data directly from Joomla.
Step 6: Render Blog Page
Now create your blog listing page:
export default async function BlogPage() {
  const data = await getArticles();

  return (
    <div>
      {data.data.map((article) => (
        <div key={article.id}>
          <h2>{article.attributes.title}</h2>
        </div>
      ))}
    </div>
  );
}
Clean and simple.
Step 7: Create Dynamic Blog Pages
Use slugs from Joomla.
export async function generateStaticParams() {
  const data = await getArticles();

  return data.data.map((article) => ({
    slug: article.attributes.alias,
  }));
}
Now each article becomes:
/blog/my-article-slug
Fully dynamic.
Important: Avoid Duplicate Content
This step is critical.
Your Joomla backend is public.
So the same content exists in two places:
- Joomla URLs
- Next.js blog pages
This creates duplicate content.
Fix it:
Go to Joomla Global Configuration and set:
- Robots → noindex
This ensures only your Next.js site gets indexed.
Why I Didn’t Use WordPress
You might ask:
Why not use WordPress?
It has an API:
/wp-json/wp/v2/posts
And yes, it works.
But here’s the reality.
How WordPress Works in Headless Mode
By default:
- API is public
- No authentication required
- Anyone can access your content
Example:
https://example.com/wp-json/wp/v2/posts
You get everything instantly.
The Limitations
Authentication is not strict by default
To secure it, you need:
- Application passwords
- JWT plugins
- OAuth setups
This adds complexity.
Plugin dependency
For real projects, you often need:
- ACF for custom fields
- Authentication plugins
- API extensions
More plugins means:
- More maintenance
- More risks
Less control over API behavior
Customizing APIs requires:
- Hooks
- Filters
- Custom coding
It’s flexible, but not clean.
Larger attack surface
Because of its popularity:
- More bots target it
- Plugin vulnerabilities are common
- APIs are often exposed
Why Joomla Worked Better
With Joomla, things were straightforward.
- API is structured
- Authentication is built-in
- No extra plugins needed
- Better control over access
It gave me:
- A secure backend
- Clean API integration
- Less maintenance
Performance Benefits
This setup is fast.
Because:
- Main site is static
- Blog is dynamic only where needed
- API calls are lightweight
This improves:
- Load speed
- SEO
- User experience
Pros of Using Joomla as Headless CMS
- No need to build CMS
- Secure admin panel
- Built-in API
- Easy for clients
- Works well with modern frameworks
- Scalable
Cons You Should Know
- Requires initial setup understanding
- API is less beginner-friendly
- Token handling required
- Joomla UI may feel heavy for small tasks
When You Should Use This Approach
Use it when:
- You have a static site
- You need dynamic blog content
- You want a secure backend
- You want to save development time
Avoid it when:
- You need full CMS-driven frontend
- You want everything in one system
Final Thoughts
This setup worked perfectly.
The client got:
- A fast website
- A simple backend
- Full control over content
And I avoided building a CMS from scratch.
Sometimes the smartest solution is not building more.
It’s choosing better tools.
If you’re working with Next.js and need a CMS, give Joomla headless a try.