Category: Joomla

  • Joomla 5 htaccess: The Ultimate Guide to Optimizing and Securing Your Site

    Joomla 5 htaccess: The Ultimate Guide to Optimizing and Securing Your Site

    Ever since its launch, Joomla has been a favorite among web developers. And now, with Joomla 5, it’s promising to be even more robust and versatile. One feature that stands out in is the Joomla 5 htaccess file – an essential tool for both optimization and security.
    Today, we’ll deep dive into “Joomla 5 .htaccess” and unveil its unmatched potential.

    Introduction to .htaccess

    For those unfamiliar, .htaccess (Hypertext Access) is a configuration file used by Apache-based web servers. This hidden file allows you to make changes and tweaks at the directory level. Think of it as the manager of your website’s server, instructing it on how to behave in various scenarios.

    Certainly, let’s add the new subtitle and integrate your inputs into the article. Here’s the revised section:

    Where Can I Find the .htaccess File?

    For those new to Joomla or even for regular users who haven’t delved into its backend, locating the .htaccess file can be a tad confusing. So, let’s clear up that mystery.

    When you download the Joomla 5 package from the official website and unzip it, you’re greeted with various folders and files. These are the core files essential for Joomla’s functionality. Among these files is one named htaccess.txt. This file is crucial and is located in the root folder of the Joomla website. But wait, before you think you’re ready to delve into .htaccess functionalities, there’s a vital step to perform.

    You need to rename the htaccess.txt to .htaccess to activate its features. Only after renaming it does the file assume its role in Joomla’s structure and starts governing the directives for the website.
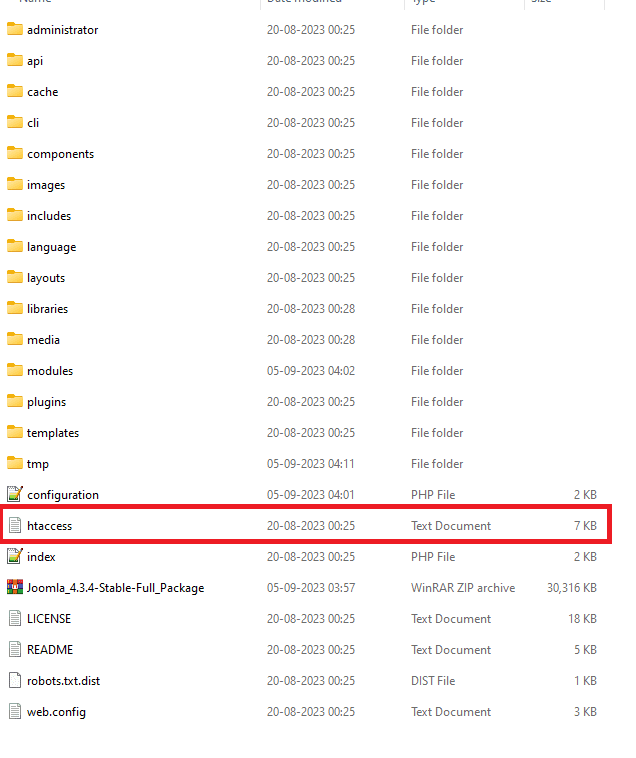
    joomla 4 htaccess

    What does this default Joomla 5 .htaccess file contain?

    Now, what does this default file contain? The default .htaccess file of Joomla 5 encompasses several rules and directives. These rules are meticulously crafted to ensure optimum functionality and security right out of the box. However, as we’ve discussed in this article, there’s always room for enhancement and personal customization.

    ##
    # @package    Joomla
    # @copyright  (C) 2005 Open Source Matters, Inc. <https://www.joomla.org>
    # @license    GNU General Public License version 2 or later; see LICENSE.txt
    ##
    
    ##
    # READ THIS COMPLETELY IF YOU CHOOSE TO USE THIS FILE!
    #
    # The line 'Options +FollowSymLinks' may cause problems with some server configurations.
    # It is required for the use of Apache mod_rewrite, but it may have already been set by
    # your server administrator in a way that disallows changing it in this .htaccess file.
    # If using it causes your site to produce an error, comment it out (add # to the
    # beginning of the line), reload your site in your browser and test your sef urls. If
    # they work, then it has been set by your server administrator and you do not need to
    # set it here.
    ##
    
    ## MISSING CSS OR JAVASCRIPT ERRORS
    #
    # If your site looks strange after enabling this file, then your server is probably already
    # gzipping css and js files and you should comment out the GZIP section of this file.
    ##
    
    ## OPENLITESPEED
    #
    # If you are using an OpenLiteSpeed web server then any changes made to this file will
    # not take effect until you have restarted the web server.
    ##
    
    ## Can be commented out if causes errors, see notes above.
    Options +FollowSymlinks
    Options -Indexes
    
    ## No directory listings
    <IfModule mod_autoindex.c>
    	IndexIgnore *
    </IfModule>
    
    ## Suppress mime type detection in browsers for unknown types
    <IfModule mod_headers.c>
    	Header always set X-Content-Type-Options "nosniff"
    </IfModule>
    
    ## Protect against certain cross-origin requests. More information can be found here:
    ## https://developer.mozilla.org/en-US/docs/Web/HTTP/Cross-Origin_Resource_Policy_(CORP)
    ## https://web.dev/why-coop-coep/
    #<IfModule mod_headers.c>
    #	Header always set Cross-Origin-Resource-Policy "same-origin"
    #	Header always set Cross-Origin-Embedder-Policy "require-corp"
    #</IfModule>
    
    ## Disable inline JavaScript when directly opening SVG files or embedding them with the object-tag
    <FilesMatch "\.svg$">
      <IfModule mod_headers.c>
        Header always set Content-Security-Policy "script-src 'none'"
      </IfModule>
    </FilesMatch>
    
    ## These directives are only enabled if the Apache mod_rewrite module is enabled
    <IfModule mod_rewrite.c>
    	RewriteEngine On
    
    	## Begin - Rewrite rules to block out some common exploits.
    	# If you experience problems on your site then comment out the operations listed
    	# below by adding a # to the beginning of the line.
    	# This attempts to block the most common type of exploit `attempts` on Joomla!
    	#
    	# Block any script trying to base64_encode data within the URL.
    	RewriteCond %{QUERY_STRING} base64_encode[^(]*\([^)]*\) [OR]
    	# Block any script that includes a <script> tag in URL.
    	RewriteCond %{QUERY_STRING} (<|%3C)([^s]*s)+cript.*(>|%3E) [NC,OR]
    	# Block any script trying to set a PHP GLOBALS variable via URL.
    	RewriteCond %{QUERY_STRING} GLOBALS(=|\[|\%[0-9A-Z]{0,2}) [OR]
    	# Block any script trying to modify a _REQUEST variable via URL.
    	RewriteCond %{QUERY_STRING} _REQUEST(=|\[|\%[0-9A-Z]{0,2})
    	# Return 403 Forbidden header and show the content of the root home page
    	RewriteRule .* index.php [F]
    	#
    	## End - Rewrite rules to block out some common exploits.
    
    	## Begin - Custom redirects
    	#
    	# If you need to redirect some pages, or set a canonical non-www to
    	# www redirect (or vice versa), place that code here. Ensure those
    	# redirects use the correct RewriteRule syntax and the [R=301,L] flags.
    	#
    	## End - Custom redirects
    
    	##
    	# Uncomment the following line if your webserver's URL
    	# is not directly related to physical file paths.
    	# Update Your Joomla! Directory (just / for root).
    	##
    
    	# RewriteBase /
    
    	## Begin - Joomla! core SEF Section.
    	#
    	# PHP FastCGI fix for HTTP Authorization, required for the API application
    	RewriteRule .* - [E=HTTP_AUTHORIZATION:%{HTTP:Authorization}]
    	# -- SEF URLs for the API application
    	# If the requested path starts with /api, the file is not /api/index.php
    	# and the request has not already been internally rewritten to the
    	# api/index.php script
    	RewriteCond %{REQUEST_URI} ^/api/
    	RewriteCond %{REQUEST_URI} !^/api/index\.php
    	# and the requested path and file doesn't directly match a physical file
    	RewriteCond %{REQUEST_FILENAME} !-f
    	# and the requested path and file doesn't directly match a physical folder
    	RewriteCond %{REQUEST_FILENAME} !-d
    	# internally rewrite the request to the /api/index.php script
    	RewriteRule .* api/index.php [L]
    	# -- SEF URLs for the public frontend application
    	# If the requested path and file is not /index.php and the request
    	# has not already been internally rewritten to the index.php script
    	RewriteCond %{REQUEST_URI} !^/index\.php
    	# and the requested path and file doesn't directly match a physical file
    	RewriteCond %{REQUEST_FILENAME} !-f
    	# and the requested path and file doesn't directly match a physical folder
    	RewriteCond %{REQUEST_FILENAME} !-d
    	# internally rewrite the request to the index.php script
    	RewriteRule .* index.php [L]
    	#
    	## End - Joomla! core SEF Section.
    </IfModule>
    
    ## These directives are only enabled if the Apache mod_rewrite module is disabled
    <IfModule !mod_rewrite.c>
    	<IfModule mod_alias.c>
    		# When Apache mod_rewrite is not available, we instruct a temporary redirect
    		# of the start page to the front controller explicitly so that the website
    		# and the generated links can still be used.
    		RedirectMatch 302 ^/$ /index.php/
    		# RedirectTemp cannot be used instead
    	</IfModule>
    </IfModule>
    
    ## GZIP
    ## These directives are only enabled if the Apache mod_headers module is enabled.
    ## This section will check if a .gz file exists and if so will stream it
    ##     directly or fallback to gzip any asset on the fly
    ## If your site starts to look strange after enabling this file, and you see
    ##     ERR_CONTENT_DECODING_FAILED in your browser console network tab,
    ##     then your server is already gzipping css and js files and you don't need this
    ##     block enabled in your .htaccess
    <IfModule mod_headers.c>
    	# Serve gzip compressed CSS files if they exist
    	# and the client accepts gzip.
    	RewriteCond "%{HTTP:Accept-encoding}" "gzip"
    	RewriteCond "%{REQUEST_FILENAME}\.gz" -s
    	RewriteRule "^(.*)\.css" "$1\.css\.gz" [QSA]
    
    	# Serve gzip compressed JS files if they exist
    	# and the client accepts gzip.
    	RewriteCond "%{HTTP:Accept-encoding}" "gzip"
    	RewriteCond "%{REQUEST_FILENAME}\.gz" -s
    	RewriteRule "^(.*)\.js" "$1\.js\.gz" [QSA]
    
    	# Serve correct content types, and prevent mod_deflate double gzip.
    	RewriteRule "\.css\.gz$" "-" [T=text/css,E=no-gzip:1]
    	RewriteRule "\.js\.gz$" "-" [T=text/javascript,E=no-gzip:1]
    
    	<FilesMatch "(\.js\.gz|\.css\.gz)$">
    		# Serve correct encoding type.
    		Header set Content-Encoding gzip
    
    		# Force proxies to cache gzipped &
    		# non-gzipped css/js files separately.
    		Header append Vary Accept-Encoding
    	</FilesMatch>
    </IfModule>

    What if You Don’t Find the .htaccess File in the Root Folder?

    Occasionally, despite your best efforts, the .htaccess file might seem to be missing from its expected location in the root folder. Before panic sets in, understand that there are straightforward remedies to address this. Here’s what you can do:

    Using FTP like FileZilla: If you’re accessing your website files through an FTP client like FileZilla, the solution is pretty direct:

    1. In the root directory, create a new file and name it .htaccess.
    2. Open this new file using a text editor of your choice.
    3. Paste the pre-configured default .htaccess code into this file.
    4. Save and close the file. Your Joomla site now has the essential .htaccess configurations in place.

    Using cPanel: For those who manage their website through cPanel, the process is slightly different:

    1. Once you’re in the file manager section of cPanel, look for the ‘Settings’ button typically located at the top right corner.
    2. Click on it, and a pop-up window appears.
    3. In this window, find the option labeled “Show Hidden Files (dotfiles)” and ensure it’s checked.
    4. Save the changes and return to the file manager. Your .htaccess file should now be visible if it was previously hidden.

    SEO Optimization using .htaccess

    Harnessing the power of .htaccess can provide an indispensable boost to your Joomla 5 site’s SEO. Here’s how you can make the most out of it for SEO optimization:

    a) Removing index.php:
    The presence of index.php in your URLs is not just unsightly but can also impede your SEO efforts. To make your Joomla URLs cleaner and more search engine-friendly, you can use the .htaccess file to remove index.php.

    RewriteEngine On
    RewriteCond %{THE_REQUEST} /index\.php [NC]
    RewriteRule ^(.*?)index\.php[^/] /$1 [L,R=301,NC]

    b) Redirection of Old URL to New URL:
    Over time, as you update or change your website, some URLs might become obsolete. Instead of leading users and search engines to a 404 page, you can redirect them to the new page.

    RewriteEngine On
    RewriteRule ^old-url$ /new-url [L,R=301]

    c) Joomla 5 htaccess 301 Redirection:
    If you’ve moved content in Joomla 5, you want to ensure users and search engines are directed to the right location without damaging your SEO. The .htaccess file can be used for creating 301 redirects.

    RewriteEngine On
    RewriteRule ^old-joomla-url$ /new-joomla-url [L,R=301]

    d) www to non-www Joomla:
    Whether for aesthetics or SEO consistency, some prefer the non-www version of their domain. To redirect all www requests to the non-www version in Joomla, you can add the following:

    RewriteEngine On
    RewriteCond %{HTTP_HOST} ^www\.yoursite\.com [NC]
    RewriteRule ^(.*)$ https://yoursite.com/$1 [L,R=301]

    e) non www to www Joomla redirection:
    When you insert this into your .htaccess file, any visitor accessing “yoursite.com” will be automatically redirected to “www.yoursite.com”. Just make sure to replace “yoursite.com” with your actual domain name. This not only ensures consistency for your users but also prevents potential duplicate content issues with search engines.

    RewriteEngine On
    RewriteCond %{HTTP_HOST} ^yoursite\.com [NC]
    RewriteRule ^(.*)$ https://www.yoursite.com/$1 [L,R=301]

    Role of .htaccess File in SEF (Search Engine Friendly URLs)

    The .htaccess file isn’t just a way to configure server directives; it’s a vital tool in ensuring that Joomla provides Search Engine Friendly (SEF) URLs. SEF URLs are crucial for both usability and SEO. They turn complex

    URL structures into clean, readable, and memorable URLs which are beneficial for both users and search engines.

    Configuring SEF in Global Configuration
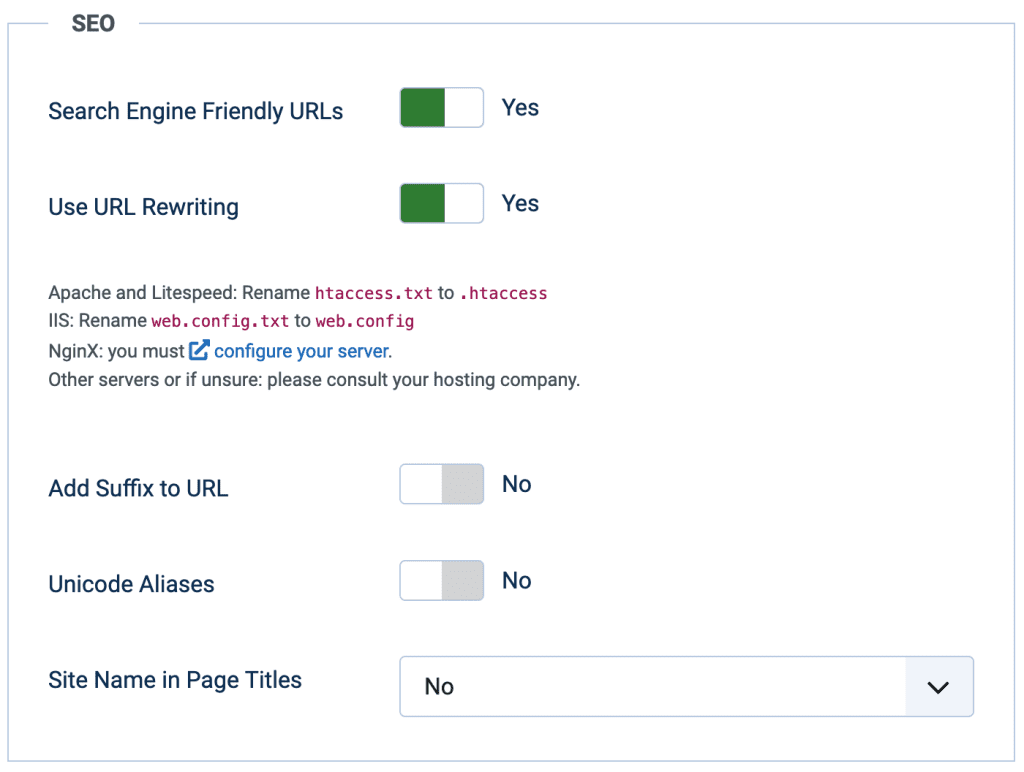
    joomla 4 sef url
    1. Access Joomla’s Backend: First, log into your Joomla administrator dashboard.
    2. Navigate to System: From the menu, select “System,” and then click on “Global Configuration.”
    3. SEO Settings: On the screen, you’ll find the “SEO Settings” tab. Click on it.
    4. Enable SEF URLs: Find the option named “Search Engine Friendly URLs” and set it to “Yes.” This setting will rewrite your URLs to be clean and free of query strings.
    5. Use URL Rewriting: Enable the “Use URL Rewriting” option. This feature requires the .htaccess file to function. It removes the “index.php” from the URL, making it even more user-friendly.
    6. Save and Close: After making these changes, click on the “Save” or “Save & Close” button to apply the settings.

    How Joomla Default Works with .htaccess?

    When Joomla is installed, it comes with a file named htaccess.txt. Once renamed to .htaccess, this file provides a set of rules that help Apache Web Servers understand how to handle URLs. It essentially translates the SEF URLs to a format that Joomla can interpret.

    For Joomla to produce SEF URLs:

    1. URL Translation: When a user enters a SEF URL into their browser, Joomla uses the .htaccess file to translate this URL into a format that it can understand, which often includes index.php and other query strings.
    2. Redirection: The .htaccess file can also handle redirections. If you’ve changed the URL of a page, you can set up a 301 redirect in the .htaccess file, ensuring search engines and users are directed to the correct page.
    3. Removing Unwanted Strings: As mentioned, the .htaccess file helps in removing unnecessary strings from the URL, like index.php, making it tidier and more readable.
    4. Security: Apart from SEF, the .htaccess file plays a pivotal role in enhancing the security of a Joomla website. It can be used to block specific IP addresses, prevent directory listings, or even restrict access to certain parts of your site.

    Enhancing Security with .htaccess

    Beyond SEO, .htaccess is a knight in shining armor when it comes to security.

    a) Protecting Your Admin Area:
    Restrict access to your Joomla admin area by IP address, safeguarding it from unauthorized access.

    Order Deny,Allow
    Deny from all
    Allow from xx.xx.xx.xx

    b) Disable Directory Listings:
    Prevent hackers from viewing the contents of your directories.

    Options -Indexes

    Speed Optimization using .htaccess

    Site speed plays a crucial role in user experience and SEO. Use .htaccess to leverage browser caching and Gzip compression, leading to faster load times.

    Leverage Browser Caching

    Leveraging browser caching can drastically speed up your website for returning visitors. Here’s the .htaccess code to leverage browser caching for various file types:

    ## EXPIRES CACHING ##
    <IfModule mod_expires.c>
    ExpiresActive On
    ExpiresByType image/jpg "access 1 year"
    ExpiresByType image/jpeg "access 1 year"
    ExpiresByType image/gif "access 1 year"
    ExpiresByType image/png "access 1 year"
    ExpiresByType text/css "access 1 month"
    ExpiresByType text/html "access 1 month"
    ExpiresByType application/pdf "access 1 month"
    ExpiresByType text/x-javascript "access 1 month"
    ExpiresByType application/x-shockwave-flash "access 1 month"
    ExpiresByType image/x-icon "access 1 year"
    ExpiresDefault "access 1 month"
    </IfModule>
    ## EXPIRES CACHING ##

    Enable Gzip Compression

    GZIP compression can significantly reduce the size of your website’s files, resulting in faster load times for your users.

    To enable GZIP compression via .htaccess, you’ll want to ensure that the mod_deflate module is enabled on your server. Here’s the .htaccess code to enable GZIP compression:

    <IfModule mod_deflate.c>
      # Compress HTML, CSS, JavaScript, Text, XML and fonts
      AddOutputFilterByType DEFLATE application/javascript
      AddOutputFilterByType DEFLATE application/rss+xml
      AddOutputFilterByType DEFLATE application/vnd.ms-fontobject
      AddOutputFilterByType DEFLATE application/x-font
      AddOutputFilterByType DEFLATE application/x-font-opentype
      AddOutputFilterByType DEFLATE application/x-font-otf
      AddOutputFilterByType DEFLATE application/x-font-truetype
      AddOutputFilterByType DEFLATE application/x-font-ttf
      AddOutputFilterByType DEFLATE application/x-javascript
      AddOutputFilterByType DEFLATE application/xhtml+xml
      AddOutputFilterByType DEFLATE application/xml
      AddOutputFilterByType DEFLATE font/opentype
      AddOutputFilterByType DEFLATE font/otf
      AddOutputFilterByType DEFLATE font/ttf
      AddOutputFilterByType DEFLATE image/svg+xml
      AddOutputFilterByType DEFLATE image/x-icon
      AddOutputFilterByType DEFLATE text/css
      AddOutputFilterByType DEFLATE text/html
      AddOutputFilterByType DEFLATE text/javascript
      AddOutputFilterByType DEFLATE text/plain
      AddOutputFilterByType DEFLATE text/xml
    
      # Remove browser bugs (only needed for really old browsers)
      BrowserMatch ^Mozilla/4 gzip-only-text/html
      BrowserMatch ^Mozilla/4\.0[678] no-gzip
      BrowserMatch \bMSIE !no-gzip !gzip-only-text/html
      Header append Vary User-Agent
    </IfModule>

    Add the above code to your .htaccess file. When this code is active, it will compress specified MIME types when serving them to browsers that support compression.

    Important: Always make a backup of your .htaccess file before making any changes. Test your website after applying these changes to ensure there aren’t any unforeseen issues. If you face any issues, you can revert to the backup version of your .htaccess file.

    Tips for Managing .htaccess in Joomla 5

    • Backup Before Making Changes: Before diving into the .htaccess edits, ensure you have a backup. This precaution ensures that if something goes wrong, you can revert to the previous state without much hassle.
    • Use a Plain Text Editor: It’s essential to use a plain text editor when editing the .htaccess file. Programs like Notepad on Windows or TextEdit on macOS are ideal.
    • Test After Every Change: After each modification, always check your Joomla site to ensure everything is functioning correctly. Small errors in the .htaccess file can result in website downtime.
    • Stay Updated: Joomla, like other CMS platforms, is ever-evolving. Stay updated with Joomla’s official documentation and community forums to leverage new .htaccess tips and tricks as they emerge.
    • .htaccess Generator: Effortlessly create a custom .htaccess file with a wide range of options tailored to your needs.

    Common Issues & Their Fixes

    Sometimes, changes in .htaccess can lead to unforeseen issues. Here’s how to troubleshoot some common problems:

    a) 500 Internal Server Error: This often indicates a typo or mistake in your .htaccess code. Revert to your backup and reapply changes step by step, testing as you go.

    b) Redirect Loops: If your site keeps refreshing or redirecting, there might be conflicting rules in your .htaccess file. Review the file and remove redundant or conflicting redirect rules.

    c) Permissions Error: Ensure that your .htaccess file permissions are set correctly. A 644 permission is generally recommended.

    Conclusion

    The .htaccess file in Joomla 5 is an unsung hero, quietly working in the background to boost your SEO, enhance security, and improve site speed. By understanding its capabilities and making the most of it, you’re not just optimizing your website; you’re creating a safer, faster, and overall better experience for your visitors.

    Keep innovating, keep experimenting, and let Joomla 5’s .htaccess be a cornerstone of your site’s success story!


  • Joomla to WordPress Migration with Case Study

    Joomla to WordPress Migration with Case Study

    Nick had been using Joomla for 14 years to manage his business website. However, he decided to migrate to WordPress due to its flexibility and user-friendly interface. This case study explores Nick’s journey, his reasons for migrating, and how we helped him transition his site from Joomla to WordPress.

    Why Migrate Joomla to WordPress?

    Despite Joomla’s robustness, Nick faced challenges:

    • Complexity: Joomla’s interface was becoming cumbersome.
    • Limited Plugins: Fewer options compared to WordPress.
    • SEO Challenges: Difficulty in optimizing content for search engines.
    • Community Support: WordPress offers a larger, more active community.

    The Approach

    Nick approached us with a clear objective: seamless migration with minimal downtime and data loss. Here’s how we tackled the project:

    Initial Consultation

    We discussed Nick’s specific needs, his site’s structure, and identified key functionalities to retain or improve upon in WordPress.

    Preparation Phase

    • Backup: Ensured a complete backup of Nick’s Joomla site.
    • Hosting Assessment: Verified hosting capabilities to support WordPress efficiently.

    Installing WordPress

    • Set up WordPress on Nick’s existing domain, ensuring compatibility with current hosting.
    • If Joomla was installed in the root directory, we created a “wordpress” folder for the new site.

    Migration with FG Joomla to WordPress Plugin

    Plugin Installation:

    • Installed and activated the FG Joomla to WordPress plugin.
    • Database Configuration: Gathered Joomla’s database details for a smooth transition.

    Steps for Migration

    1. Install WordPress on Your Domain

    wordpress install

    • Create Folder: If Joomla is in your domain root, create a “wordpress” folder.
    • Login: Access the backend at https://www.example.com/wordpress/wp-admin.

    2. Install the FG Joomla to WordPress Plugin

    FG Joomla to WordPress Plugin
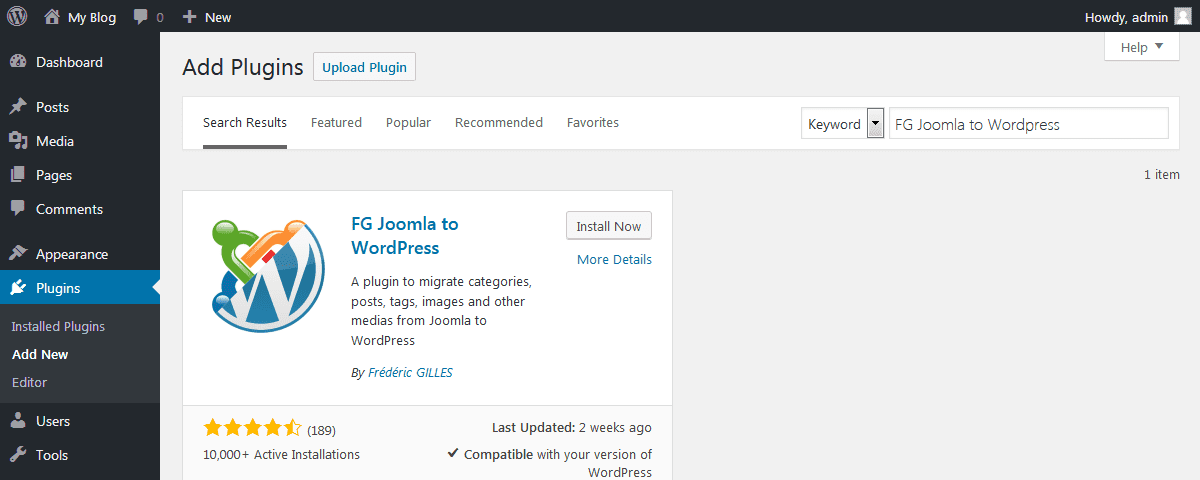
    • Navigate: Dashboard > Plugins > Add New.
    • Search: “FG Joomla to WordPress,” install, and activate the plugin.

    3. Get Joomla Database Details

    Joomla Database Configuration

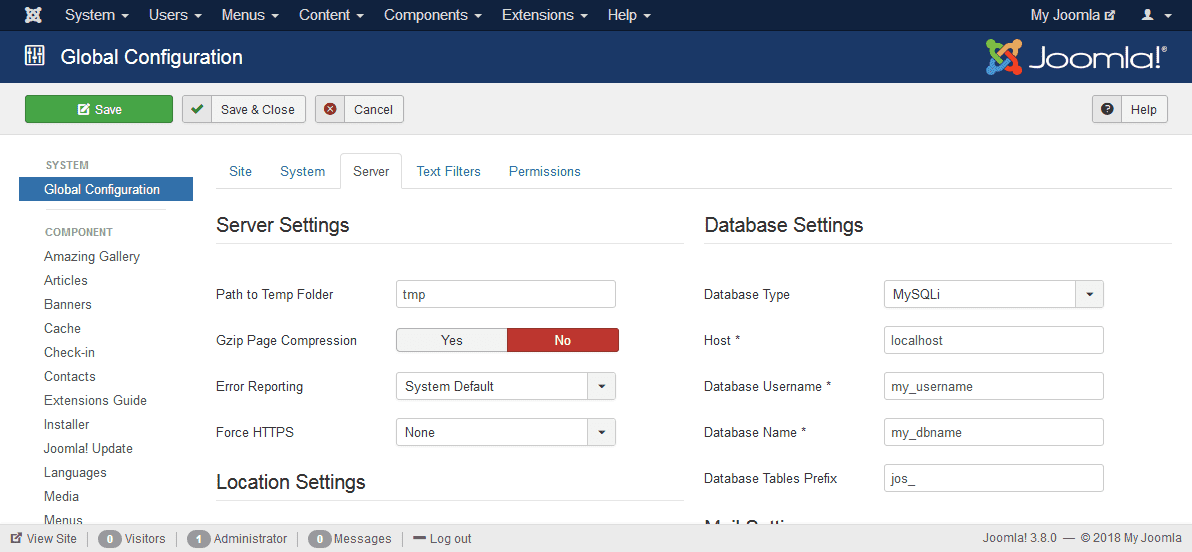
    In the example screenshot, we demonstrate using Joomla 3.x. However, you can migrate content from Joomla 1.5.x, 2.5.x, 4.x, and 5.x using a similar process.

    • Access: Joomla’s Global Configuration > System Tab.
    • Retrieve: Host, Database Username, Database Name, Database Table Prefix, and Password.
      • If you don’t remember the password, you can find it in the configuration.php file > public $password = ‘********’;

    4. Start the migration process

    Wordpress Database

    Once you are ready with the Joomla database information, start the migration process. This will import joomla to wordpress.
    In the WordPress Dashboard, you can find the Tools Tab. Go to Tools and click the Import menu.
    Import WordPress
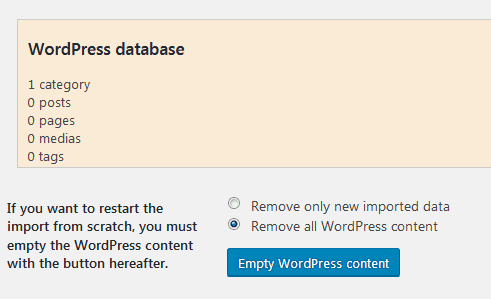
    You will find Joomla (FG) installed. Now, click on Run Importer. On the page, you will find the option “Delete all WordPress content”. This will remove all the pages, post, categories, tags and media files which are installed on a default WordPress installation. Click on the Empty WordPress Content Button.

    Upon clicking the button, it will show you a popup. Click on Ok. After removal, it will show another popup which confirms that the contents have been removed successfully. The WordPress database section will show as the following screenshot.

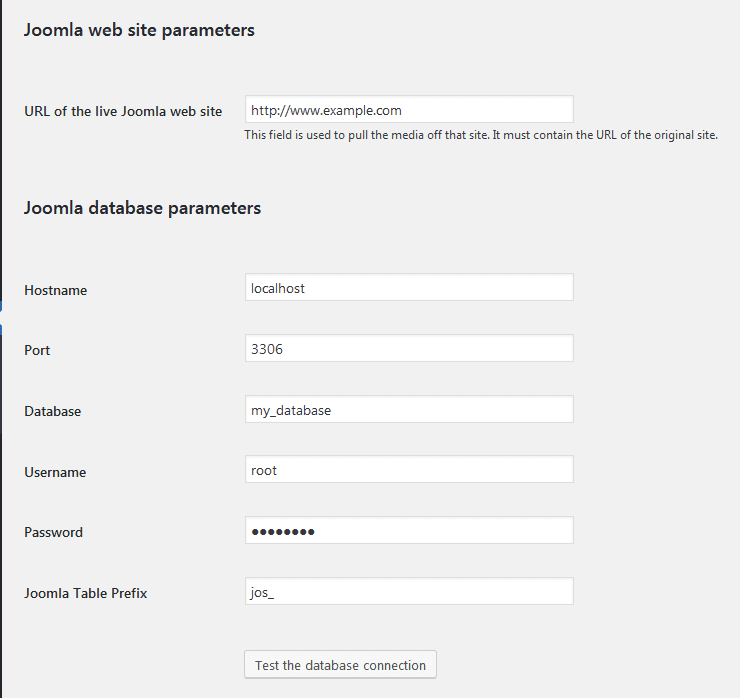
    So, you can now move down to the Joomla Website Parameters.

    • Add your Joomla website URL to the “URL of the live Joomla web site
    • Copy the Joomla database parameters from the Joomla database tab which we did in Step 3.
    • Don’t change the Port.
    Joomla Website Parameters


    Once all information is entered, follow these steps to complete the migration:

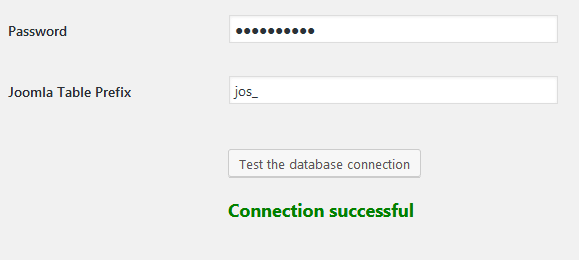
    Test Database Connection:

    • Click “Test the database connection.”
    • A green “Connection Successful” message confirms correct details.
      Conncection Successful

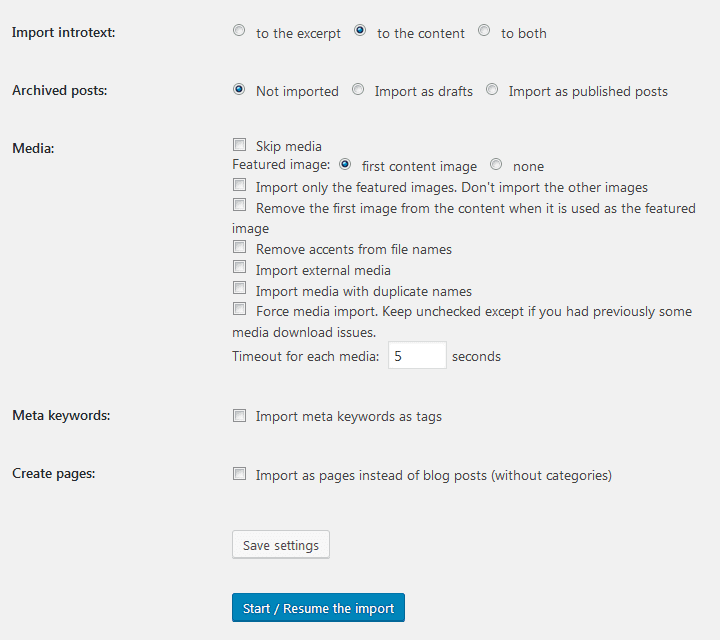
      Import Options:

      • Set “Import intro text” to content.
      • Set “Archive Posts” to “Not Imported.”
      • Configure media settings as needed.
      • Select “Create Pages” if you want Joomla articles as pages.
      • Click “Start/Resume the import” to begin.
        Setting WordPress Move

        Post-Import:
        After import, a success message appears.

        Import Successful

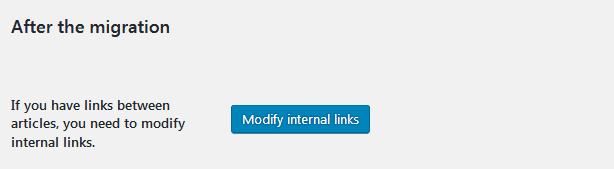
        Click “Modify internal links” to update internal links.

        Modify Internal Links

        Post-Migration Adjustments

        • Permalinks: Configure WordPress permalinks to match Joomla’s structure.
        • Internal Links: Update internal links to prevent 404 errors.
        • Theme Customization: Tailored a WordPress theme to maintain Nick’s brand identity.
        • Plugin Integration: Installed essential plugins for SEO, security, and performance enhancement.

        Testing & Launch

        • Conducted thorough testing to ensure functionality.
        • Launched the site with minimal downtime, ensuring a smooth transition for visitors.

        Outcome

        Nick’s new WordPress site is now:

        • User-Friendly: Easier content management and updates.
        • SEO-Optimized: Better visibility on search engines.
        • Feature-Rich: Access to a wide range of plugins and themes.
        • Scalable: Easily adaptable for future growth.

        Conclusion

        Nick’s migration from Joomla to WordPress was a success, offering enhanced functionality, better user experience, and improved SEO capabilities.

        If you’re considering a similar transition, we’re here to help. Have questions or need assistance with your migration? Our WordPress developers can assist you in migration of the website from Joomla to WordPress.

      1. Simplify Joomla Registration with Registration Simplifier Plugin

        Simplify Joomla Registration with Registration Simplifier Plugin

        Chris, a dedicated Joomla website owner, had recently installed the UniLogin plugin, making it easier for his users to log in using their email addresses.

        However, Chris soon encountered another challenge. He noticed that the default Joomla registration form had too many fields, causing potential users to lose patience and abandon the registration process.

        Who has the time or patience to fill out long forms?
        Have you ever been frustrated by a lengthy registration process?
        Chris realized that by simplifying the registration form, he could improve the user experience and increase the number of successful registrations.

        The Search for a Solution

        Chris wanted to streamline the registration process by removing the Username and Confirm Password fields, making the form quicker and easier to complete. He reached out to us with his problem statement, asking for a solution that wouldn’t require changes to Joomla’s core files or complex overrides.

        To find a ready-made solution, we searched through the Joomla Extensions Directory (JED) but couldn’t find any plugins that met our needs and were compatible with Joomla 4 or Joomla 5.
        This led us to develop a custom plugin tailored to Chris’s requirements.

        The Birth of Registration Simplifier

        We understood Chris’s need for a more efficient registration process. So, we proposed developing a custom user plugin. This plugin would allow administrators to:

        1. Remove Username Field: Simplifying the form by removing the username requirement.
        2. Remove the Confirm Password Field: Further reducing the number of fields users need to fill out.
        3. Set Username as Email During Registration: Streamlining the registration process by using the email address as the username.

        Chris was excited about this solution, and thus, the Registration Simplifier plugin was born.

        Implementation and User Experience

        Once the plugin was developed, Chris installed the Registration Simplifier on his Joomla website. The process was straightforward:

        1. Download and Install: Chris purchased the plugin from the JoomlaX Store for $30. He then installed it on his Joomla website.
        2. Enable the Plugin: After installation, he enabled the plugin from the Joomla plugin manager.
        3. Configure the Plugin: Chris configured the plugin settings to hide the username field and remove the confirm password field. The plugin automatically set the username as the email address during registration.

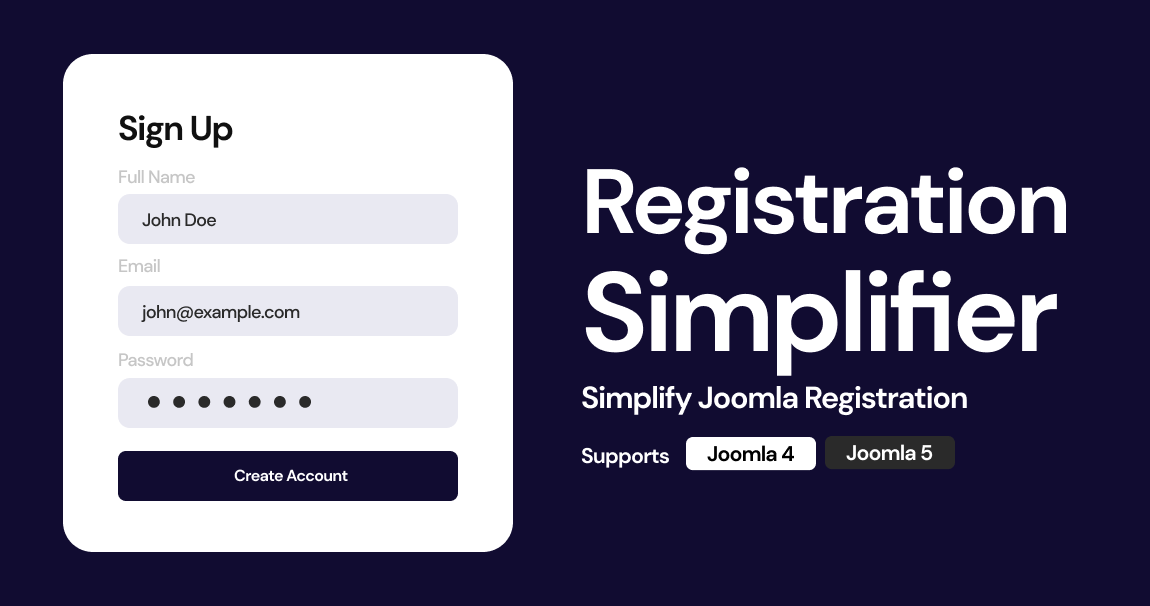
        The new, simplified registration form now included only the fields for Name, Password, and Email. This streamlined approach significantly reduced the time and effort required for new users to create an account.

        A Smoother Registration Process

        Have you noticed users abandoning your site because the registration form is too long?

        After implementing the Registration Simplifier plugin, Chris noticed a significant improvement. Users were no longer deterred by the lengthy form and could quickly complete their registration.

        The simplified process led to an increase in successful registrations and a more satisfied user base.

        Benefits of Registration Simplifier

        1. Enhanced User Experience: By simplifying the registration form, users can quickly and easily create an account.
        2. Increased Registration Success: Removing unnecessary fields reduces the chances of users abandoning the registration process.
        3. Simple and Effective: The plugin is easy to install and configure, requiring minimal effort from site administrators.

        Conclusion

        Chris’s journey from facing registration challenges to achieving a streamlined process highlights the importance of user-friendly solutions.

        The Registration Simplifier plugin transformed the registration experience for his users, ensuring a quick and easy process.

        This plugin is compatible with both Joomla 4 and Joomla 5, making it a versatile solution for various Joomla versions.

        Are you facing similar registration issues on your Joomla site? The Registration Simplifier is the perfect solution. It’s time to enhance your user experience and simplify your registration process.

        Ready to streamline your registration process? Download Registration Simplifier now and give your users the seamless experience they deserve.


      2. UniLogin Joomla Plugin: Email as Username

        UniLogin Joomla Plugin: Email as Username

        Meet Chris, a dedicated Joomla website owner. Chris loves the flexibility and robustness of Joomla for managing his site. However, he noticed a recurring issue: his users struggled to log in because Joomla’s default option required a username.

        Imagine being a regular visitor to a site, eager to log in and access your account, only to realize you’ve forgotten your username.

        Frustrating, right?
        Chris’s users felt the same way. Many times, they would end up resetting their usernames, wasting valuable time and feeling annoyed.

        Chris knew he needed a better solution, one that would allow users to log in with their email addresses, just like most modern platforms.

        The Search for a Solution

        Chris started his search for a plugin that would enable email logins on Joomla. He combed through the Joomla Extensions Directory (JED), hoping to find a perfect match.

        He posted questions on forums, seeking advice from the Joomla community. Unfortunately, his efforts were in vain. None of the available solutions met his requirements or supported the latest Joomla versions.

        Feeling a bit frustrated but not ready to give up, Chris decided to reach out to us for help. He pinged us on Skype, detailing his problem and asking if we could create a custom solution.

        The Birth of UniLogin

        We understood Chris’s predicament immediately. Changing core Joomla files wasn’t an option, as it could lead to issues during updates.

        Instead, we proposed developing a custom authentication plugin that would allow users to log in using either their email address or username. Chris was thrilled with this idea, and thus, the UniLogin plugin was born.

        The development process was smooth. We worked closely with Chris, ensuring every detail was perfect. Once the plugin was ready, we named it UniLogin, symbolizing a unified login experience.

        Implementation and User Experience

        Excited about the new solution, Chris installed the UniLogin plugin on his Joomla website. The installation process was straightforward:

        1. Download and Install: Chris purchased the plugin from the JoomlaX Store for just $20. He then installed it on his Joomla website.
        2. Enable the Plugin: After installation, he enabled the plugin from the Joomla Extensions Manager.
        3. Update Login Text: To ensure clarity for his users, Chris updated the login form text from “Username” to “Email or Username”.

        Here’s how he did it:

        Updating the Login Form Text

        For the Login Form:

        1. Navigate to Extensions > Language(s) > Overrides.
        2. Select your language.
        3. Create a new override.
        4. Search for COM_USERS_LOGIN_USERNAME_LABEL.
        5. Set the override text to “Email or Username”.

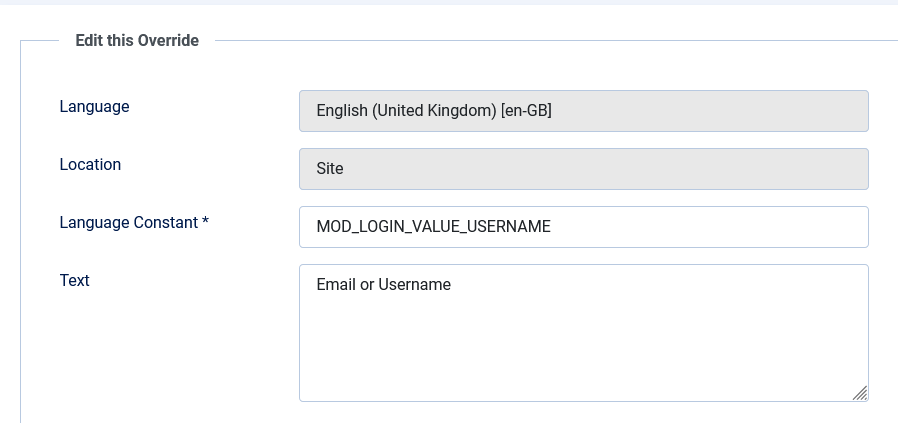
        For the Login Module:

        language override
        1. Go to Extensions > Language(s) > Overrides.
        2. Select your language.
        3. Create a new override.
        4. Search for MOD_LOGIN_VALUE_USERNAME.
        5. Set the override text to “Email or Username”.

        A Happier User Base

        After implementing UniLogin, Chris noticed a significant change. His users no longer struggled with forgotten usernames. The login process became seamless, and user satisfaction soared. Returning customers were particularly happy, as they could now log in with ease, using their email addresses.

        Benefits of UniLogin

        1. Enhanced User Experience: The plugin eliminated the hassle of username resets, making users happier and more satisfied.
        2. Increased Efficiency: The dual login option saved time for users and site administrators alike.
        3. Simple and Effective: UniLogin was easy to install and use, requiring minimal configuration.

        Conclusion

        Chris’s journey from frustration to satisfaction with his Joomla website login process highlights the importance of user-friendly solutions. UniLogin transformed the login experience for his users, ensuring they could access their accounts effortlessly. This plugin is compatible with both Joomla 4 and Joomla 5, making it a versatile solution for various Joomla versions.

        If you’re facing similar login issues on your Joomla site, UniLogin is the perfect solution. It’s time to enhance your user experience and simplify your login process.

        Ready to simplify your login process? Download UniLogin now and give your users the seamless experience they deserve.


        If you’re facing any issues with Joomla and can’t find a solution, don’t hesitate to reach out to us via Skype or our contact form. We are Joomla experts with over 15 years of experience, providing solutions to over 1,000 clients worldwide. Whether it’s troubleshooting, customization, or any other Joomla-related problem, you can be assured that we will find a solution to your problem.

      3. How to Create a Link to a Document in Joomla?

        How to Create a Link to a Document in Joomla?

        Creating links to documents in Joomla is a straightforward process. In this guide, we’ll walk you through the steps to link documents using different methods available in Joomla.

        Step 1: Prepare Your Document

        Before you can link a document, you need to ensure it’s uploaded to your Joomla site. You can do this via the Joomla Media Manager or by directly uploading it to your server via FTP.

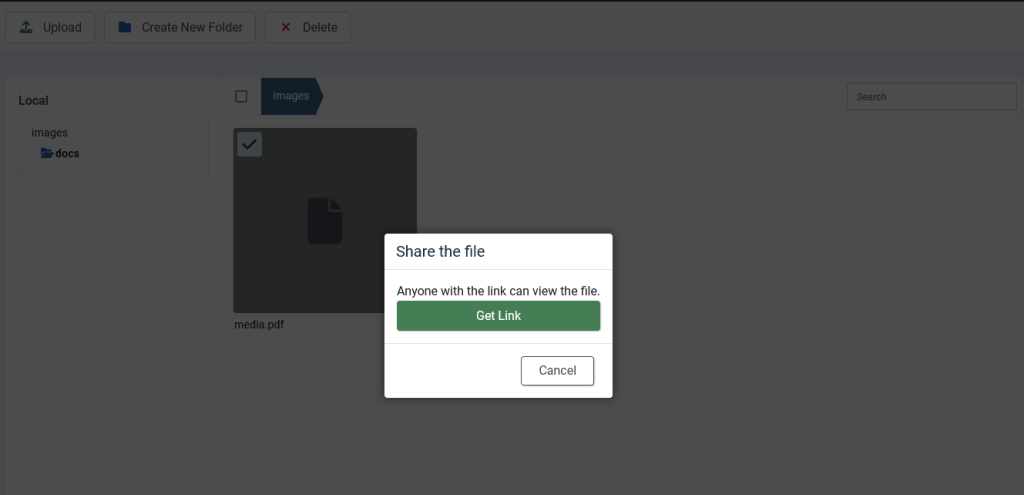
        media document upload joomla

        Using Joomla Media Manager:

        1. Navigate to Media Manager:
          • Go to Content > Media.
        2. Create a New Folder (Optional):
          • If desired, create a new folder named docs to organize your documents.
        3. Upload Your Document:
          • Click on Upload.
          • Select your document file (e.g., PDF, DOCX) and upload it.
        4. Get the Document Link:
          • Once the file is uploaded, click the three dots in the top corner of the file.
          • Select the Get Link option. A popup will appear with a Get Link button.
          • Click this button to copy the link to your clipboard for later use.

        Troubleshooting Upload Issues

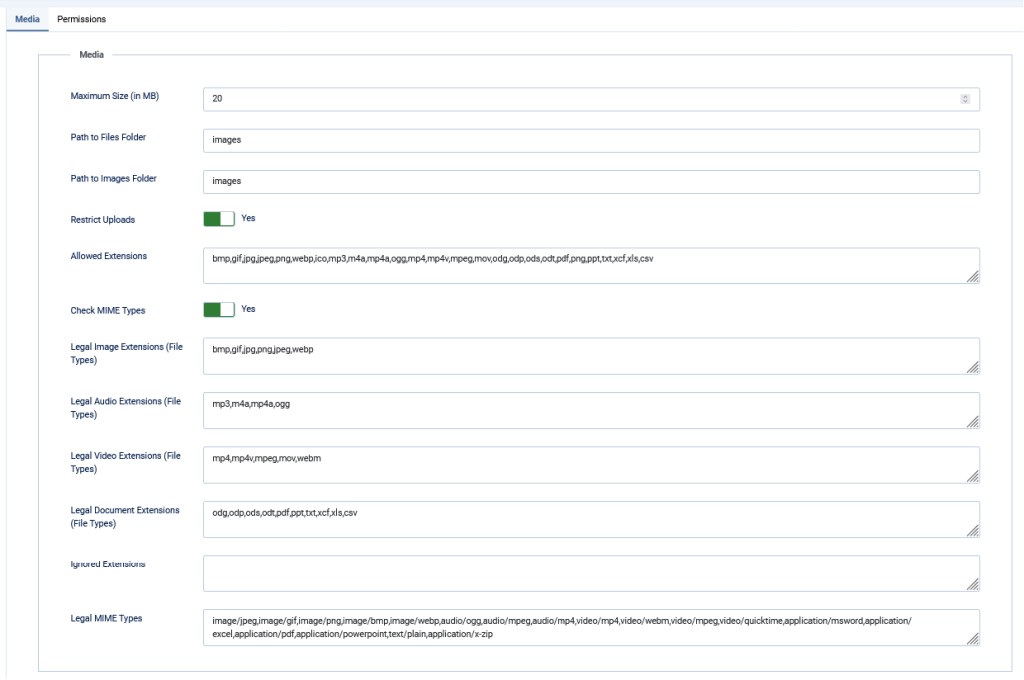
        If you encounter the error “Unable to upload file or This file type is not supported.,” you can address this issue by adjusting the Media Manager options. Here’s how to do it:

        • Go to the options of the Media Manager and check the configurations as described in the troubleshooting section of this guide.
        media options joomla 1
        1. Maximum Size (in MB):
          • Description: This setting specifies the maximum size of a file that can be uploaded via the Media Manager.
          • Current Setting: 10 MB.
          • Usage: Files larger than this size will be rejected during upload. Adjust this value based on your needs and server limitations.
        2. Path to Files Folder:
          • Description: This sets the directory path where non-image files (like documents, audio, video) are stored.
          • Current Setting: images.
          • Usage: You can change this path if you prefer to organize your files in a different directory within your Joomla installation.
        3. Path to Images Folder:
          • Description: This sets the directory path where image files are stored.
          • Current Setting: images.
          • Usage: Similar to the files folder, you can change this to organize your images in a different directory.
        4. Allowed Extensions:
          • Description: This is a comma-separated list of file extensions that are allowed to be uploaded via the Media Manager.
          • Current Setting: bmp,gif,jpg,jpeg,png,webp,ico,mp3,m4a,mp4a
          • ogg,mp4,mp4v,mpeg,mov,odg,odp,ods,odt,pdf,png,ppt,txt,xcf,xls,csv.
          • Usage: Ensure that all required file types for your website are included in this list to prevent upload issues.
        5. Check MIME Types:
          • Description: This toggle ensures that the file’s MIME type is checked against the allowed MIME types list.
          • Current Setting: Enabled (Yes).
          • Usage: This adds an extra layer of security to verify the file type being uploaded matches its MIME type.
        6. Legal Image Extensions (File Types):
          • Description: This is a list of image file extensions that are legally allowed to be uploaded.
          • Current Setting: bmp,gif,jpg,png,jpeg,webp.
          • Usage: Defines which image formats are permissible for upload.
        7. Legal Audio Extensions (File Types):
          • Description: This is a list of audio file extensions that are legally allowed to be uploaded.
          • Current Setting: mp3,m4a,mp4a,ogg.
          • Usage: Defines which audio formats are permissible for upload.
        8. Legal Video Extensions (File Types):
          • Description: This is a list of video file extensions that are legally allowed to be uploaded.
          • Current Setting: mp4,mp4v,mpeg,mov,webm.
          • Usage: Defines which video formats are permissible for upload.
        9. Legal Document Extensions (File Types):
          • Description: This is a list of document file extensions that are legally allowed to be uploaded.
          • Current Setting: odg,odp,ods,odt,pdf,ppt,txt,xcf,xls,csv.
          • Usage: Defines which document formats are permissible for upload.
        10. Ignored Extensions:
          • Description: This is a list of file extensions that should be ignored during the upload process.
          • Current Setting: Empty.
          • Usage: Use this to specify any file types that should be excluded from upload considerations.
        11. Legal MIME Types:
          • Description: This is a list of MIME types that are legally allowed to be uploaded.
          • Current Setting: A comprehensive list of MIME types including image/jpeg, image/gif, image/png, image/bmp, image/webp, audio/ogg, audio/mpeg, video/mp4, application/msword, application/excel, etc.
          • Usage: This ensures that only files with these MIME types can be uploaded, adding a layer of security to prevent malicious uploads.

        These settings collectively manage the types of files that can be uploaded to your Joomla site, their sizes, and their storage locations. Adjusting these configurations can help resolve common upload issues and ensure your site operates smoothly.

        Alternately you can upload file through FTP if you have FTP access.

        Using FTP:

        • Connect to your website’s server using an FTP client.
        • Upload your document to a directory within your Joomla installation (e.g., images/docs).

        Step 2: Create a Menu Item or Article

        To create a link to your document, you can either insert it into an article or create a direct menu link.

        Inserting a Link in an Article

        1. Create or Edit an Article:
          • Go to Content > Articles > Add New Article (or open an existing article).
          • In the editor, type the text you want to link (e.g., “Download PDF”).
        2. Link the Text to Your Document:
          • Highlight the text you want to link.
          • Click on the Insert/Edit Link icon (usually represented by a chain link).
          • In the URL field, enter the path to your document (e.g., images/docs/yourfile.pdf).
          • Set the Target to _blank if you want the document to open in a new tab.
          • Click Insert.

        Creating a Direct Menu Link

        1. Create a New Menu Item:
          • Navigate to Menus > [Your Menu] > Add New Menu Item.
          • In the Menu Item Type field, click on External URL.
        2. Link to Your Document:
          • In the Link field, enter the full URL of your document (e.g., http://yourwebsite.com/images/docs/yourfile.pdf).
          • Set other parameters like Menu Title and Target Window.
          • Click Save & Close.

        Best Practices for Linking Documents

        • Keep URLs Short and Descriptive: Ensure your document URLs are concise and meaningful to improve readability and SEO.
        • Use Clear Link Text: The text for your links should clearly describe the document. For example, use “Download Annual Report” instead of “Click Here”.
        • Organize Your Documents: Use folders and subfolders to keep your documents organized, making them easier to manage.

        Conclusion

        Linking documents in Joomla is a simple yet powerful way to provide resources to your site visitors. Whether you’re inserting links into articles or creating direct menu links, Joomla offers flexible options to meet your needs. By following the steps outlined above, you can enhance your site’s functionality and provide valuable content to your audience.

      4. Integrating Captcha with Joomla 5: Ensuring a Spam-Free Experience

        Integrating Captcha with Joomla 5: Ensuring a Spam-Free Experience

        The digital landscape constantly evolves, and content management systems like Joomla are no exception. With the upgrade from Joomla 4.4 to Joomla 5, many users were startled to see the absence of the default Joomla Captcha plugins. This absence can be disconcerting, especially when considering the essential role Captcha plays in safeguarding websites against spam attacks. However, as with most tech challenges, there’s a solution awaiting discovery.

        The Rising Need for Captcha in Today’s Digital Age

        In the contemporary web environment, user data protection and website security have become paramount. Spam attacks can not only disrupt user experience but also pose security threats, such as DDoS attacks or database breaches. Captchas act as the first line of defense against such attacks, differentiating human users from malicious bots.

        The ReCaptcha 3 Solution for Joomla 5

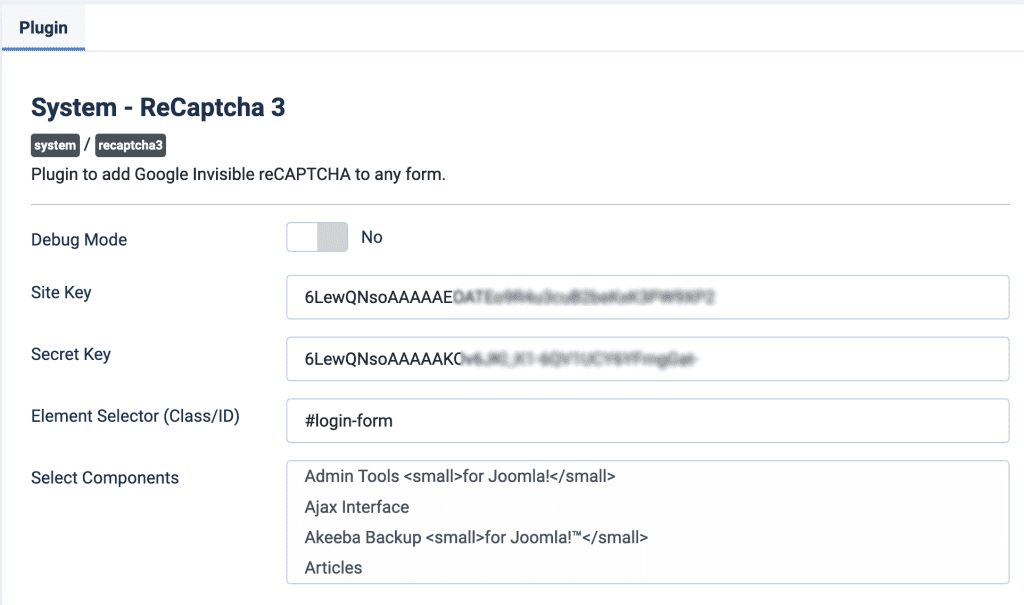
        recaptcha 3 plugin

        Understanding the pressing need for a resilient and user-friendly Captcha solution, we took the mantle and developed the ReCaptcha 3 plugin for Joomla 5. This state-of-the-art plugin offers a seamless user experience while maintaining the integrity of site security.

        A Simple Setup Process:

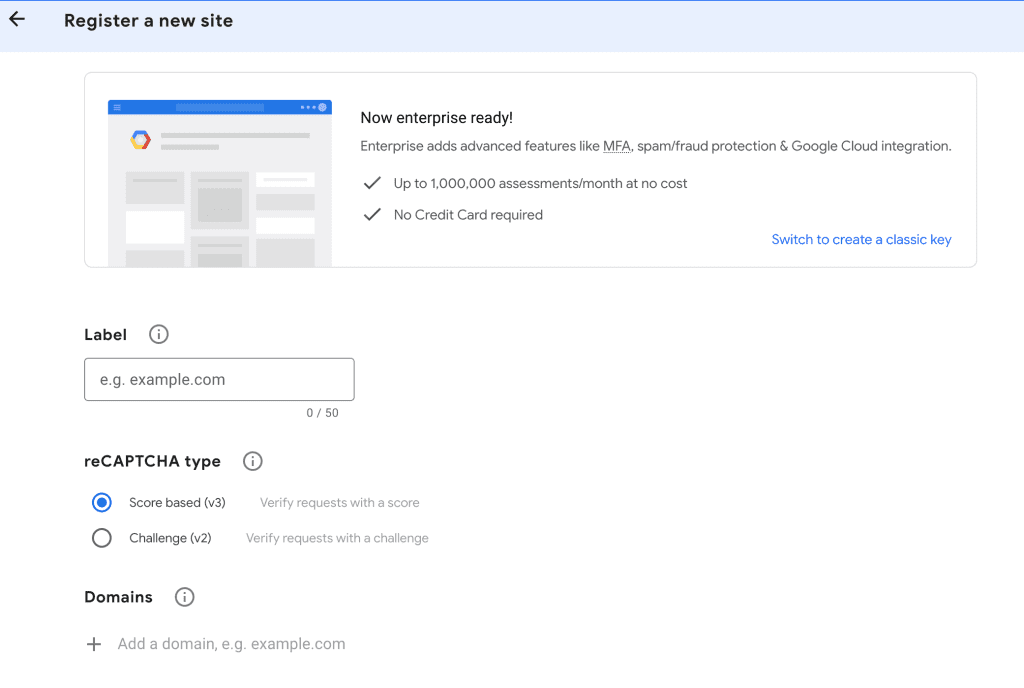
        google reCAPTCHA setup
        1. Installation: Download and install the ReCaptcha 3 plugin onto your Joomla platform.
        2. Getting Your ReCaptcha Keys:
          • Visit the Google reCAPTCHA website.
          • Sign in and access the ‘Admin Console’.
          • Create a new site by clicking on the ‘+’ icon. Ensure you select ‘reCAPTCHA v3’ and register your domain.
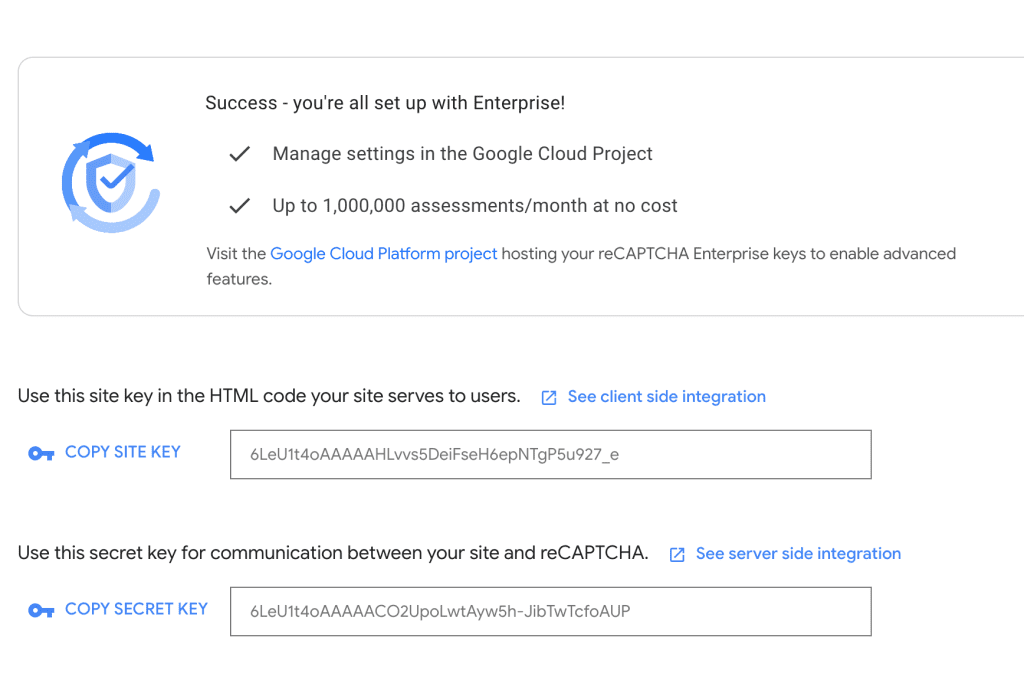
          • Upon completion, Google will generate a ‘Site Key’ and a ‘Secret Key’ for you.
        public site key reCAPTCHA
        1. Joomla Configuration:
          • Navigate to the plugin settings in your Joomla backend.
          • Input the ‘Site Key’ and ‘Secret Key’ in their respective fields.

        Invisible ReCaptcha V3: A Revolution in User Experience

        The core difference between older versions of ReCaptcha and V3 lies in the user experience. Previous iterations often required manual input from users – identifying images, inputting distorted texts, or clicking checkboxes. ReCaptcha V3, often termed as Invisible ReCaptcha, operates discreetly in the background. It assesses user behavior and provides a score, determining the likelihood of a user being a bot. This silent operation ensures that genuine users enjoy an uninterrupted browsing experience.

        Standout Features of the ReCaptcha 3 Plugin

        • Granular Component Control: Tailor the areas of your site where ReCaptcha operates by activating the feature for distinct Joomla components.
        • Debug Mode for Streamlined Setup: Especially useful during the initial stages, the debug mode highlights form-specific ID and class details, ensuring you configure the plugin correctly.
        • Customizable Form Targeting: Use CSS selectors to focus on particular forms. This flexibility is invaluable for sites with diverse forms requiring varying levels of protection.
        • Regular Updates: Our commitment doesn’t end with the installation. We offer periodic updates to maintain compatibility with Joomla’s evolving versions and to adapt to any changes in the ReCaptcha API.

        Wrapping Up

        Transitioning to Joomla 5 presents many new opportunities, but also some challenges. However, with tools like our ReCaptcha 3 plugin, website administrators can ensure that their platforms remain as secure as ever. Beyond just security, it’s about offering users a seamless experience without compromising on safety. In today’s digital age, it’s not just about building a website; it’s about building trust. And with the right tools, you’re always one step ahead.

      5. Basic Search to Smart Search in Joomla 5

        Basic Search to Smart Search in Joomla 5

        Do you know that the com_search is not available in Joomla 5?

        If you’re planning to upgrade from Joomla 4.4 to Joomla 5.0, there’s an important step you shouldn’t overlook. The com_search component is no longer supported in Joomla 5. To ensure a hassle-free upgrade, it’s recommended to uninstall com_search beforehand. In this post, we’ll guide you through this process and introduce you to the enhanced features of com_finder (Smart Search) in Joomla 5.

        Goodbye, Search (com_search)

        For years, Joomla users have relied on the com_search component to power their website’s search capabilities. It was straightforward and got the job done. But as with all technology, change is inevitable. With the release of Joomla 5, com_search has been phased out, signaling the end of its journey.

        Hello, Smart Search (com_finder)

        Joomla 5 introduces us to com_finder, better known as Smart Search. It’s not entirely new; Joomla veterans might remember it co-existing with com_search in earlier versions. But now, it stands alone as the default search solution in Joomla 5. Smart Search boasts a range of improvements:

        • Advanced Indexing: Smart Search creates a detailed index of all content, making search results more accurate.
        • Filtering Options: Users can narrow down their search results using various filters, enhancing user experience.
        • Extensible Plugins: With a rich array of plugins, you can customize Smart Search to cater specifically to your site’s needs.

        Search vs Smart Search

        Functionality and Complexity

        • com_search: Provides a straightforward search function. It allows users to query for content but may not offer refined results.
        • com_finder (Smart Search): Offers an advanced and flexible search system that enables users to filter their search results and allows for indexing, making search results more relevant and accurate.

        Integration with Extensions

        • com_search: Uses plugins that directly query the database for results. This might cause more database load, especially for large sites.
        • com_finder: Uses an indexer that pre-gathers content from the site. This reduces the direct database load during a search, providing quicker search results.

        Search Flexibility

        • com_search: Offers basic search capabilities with limited options for refining or filtering search results.
        • com_finder: Allows users to apply various filters and facets to narrow down their search, making it easier to find precise content.

        System Existence

        • com_search and com_finder coexisted in Joomla versions since 2.5. However, as Joomla evolves, there is a push towards adopting the more advanced Smart Search (com_finder), suggesting it might be the future direction of search in Joomla.

        Search Indexing

        • com_search: Doesn’t have its own indexing system; it pulls content directly from the database during each search query.
        • com_finder: Utilizes an indexing system where content is indexed beforehand. This not only speeds up search results but also ensures that the search is comprehensive, including all aspects of the site’s content.

        Both systems have their merits, but for a more advanced, efficient, and comprehensive search experience on a Joomla website, com_finder (Smart Search) is the recommended choice.

        Smart Search & Third Party Components

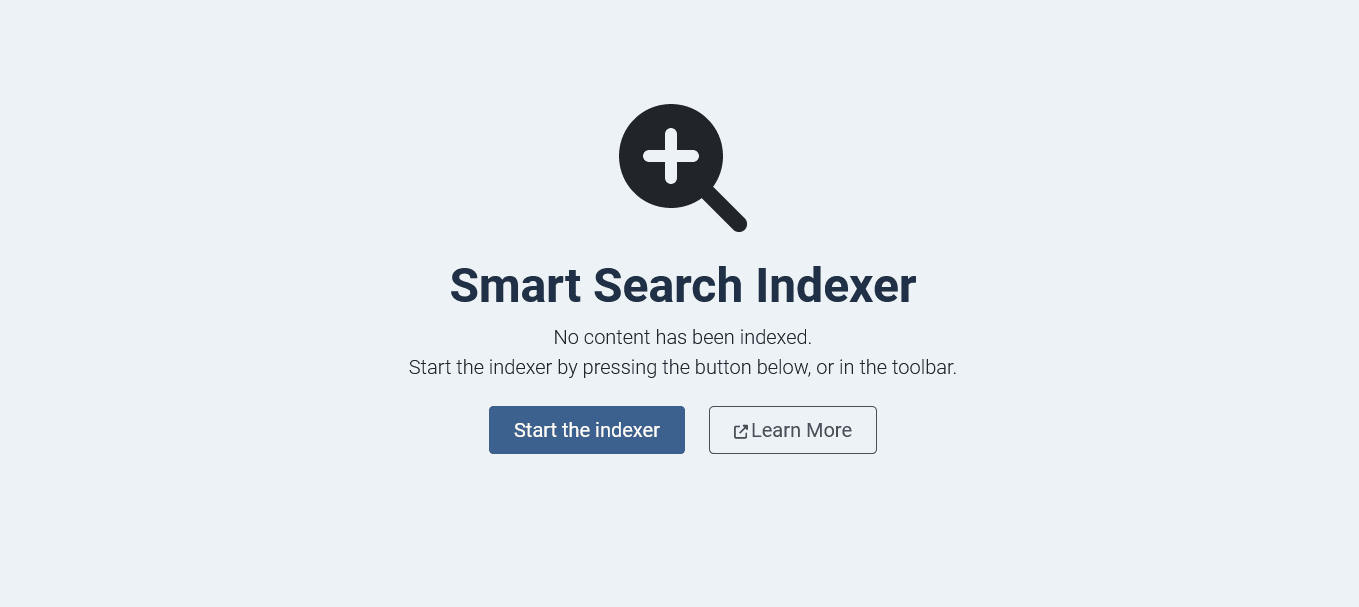
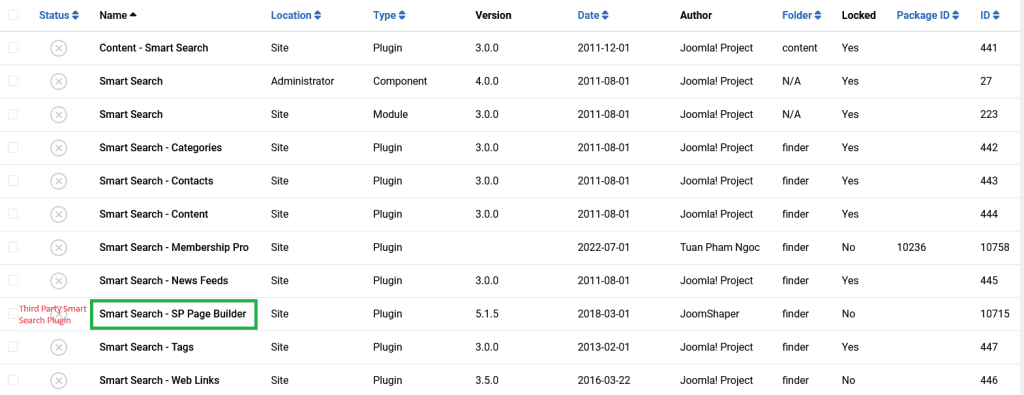
        smart search

        Joomla’s Smart Search (com_finder) is designed to be extensible and can work with third-party components. This is achieved through Smart Search plugins. Here’s how it functions:

        1. Plugins for Indexing: For Smart Search to index and search content from third-party components, there needs to be a specific Smart Search plugin for that component. Joomla core comes with several Smart Search plugins for its core components.
        2. Third-Party Extensions: Many third-party Joomla extension developers provide their own Smart Search plugins to ensure their components’ content can be indexed and searched using Smart Search. When you install such a third-party component, it’s common for it to come with its Smart Search plugin which you can enable to integrate the component’s content into Smart Search.
        3. Custom Plugins: If a third-party component doesn’t come with a Smart Search plugin, it’s possible for developers to create a custom Smart Search plugin for that component. This involves coding a plugin that tells Smart Search how to index the component’s content.
        4. Filters and Advanced Search: Apart from basic content indexing, Smart Search plugins can also provide advanced functionality, such as custom filters. This allows users to refine their search results based on specific criteria related to the third-party component.

        Conclusion

        Joomla’s transition from com_search to Smart Search (com_finder) in Joomla 5 represents its dedication to enhancing user experience with improved search capabilities. Smart Search offers not only faster and more precise results but also integrates effortlessly with third-party components. As com_search fades, Smart Search emerges as the future of Joomla’s search functionality, promising users a more efficient and enriched web experience.

      6. Schema in Joomla 5 Skyrocket Your SEO

        Schema in Joomla 5 Skyrocket Your SEO

        Do you know that Joomla 5 just took a massive leap in the SEO game? With its launch on 17th October 2023 , they’ve integrated Schema directly into their core plugins. This isn’t just a minor tweak—it’s a full-blown strategy to supercharge your site’s visibility and SEO prowess.

        Website’s search rankings are not just about keywords anymore. Let me show you how Joomla 5 is making structured data simpler and more impactful than ever.

        Ready to dominate those search results? Let’s go!

        What is Schema Markup?

        Schema markup, a form of microdata, is added to the HTML of a webpage to define exactly what it contains. Search engines then use this data to display enhanced snippets in search results. The end result? Improved visibility and a higher click-through rate.

        How to Integrate Schema in Joomla 5?

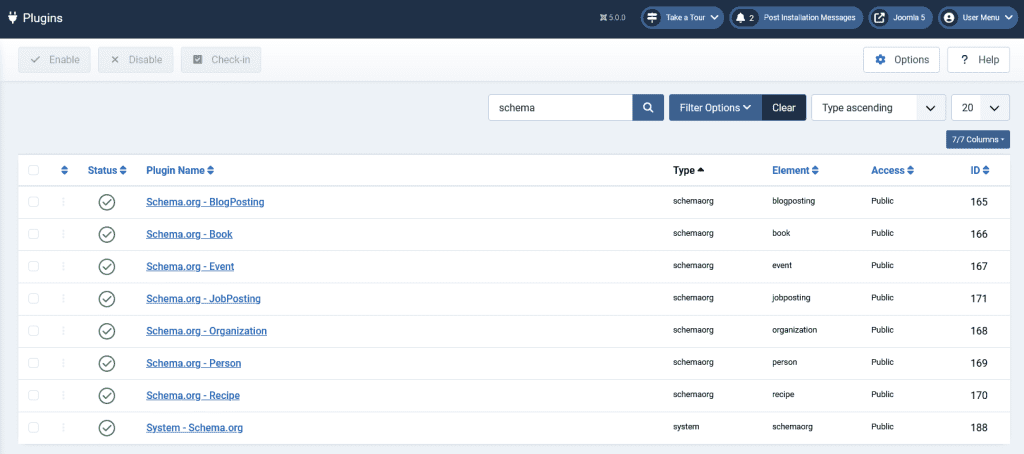
        If you have upgraded your website from Joomla 4.4 to Joomla 5 or installed a new version of Joomla 5, in the plugin section of the website you will find the list of plugin available for use by default. You will find 7 different type of Schema plugins and a System Schema plugin.

        schema.org plugins

        So, to use the plugins into your Joomla article or other components that support Schema the plugin must be enabled.

        • System – Schema.org
        • Schema.org – BlogPosting
        • Schema.org – Book
        • Schema.org – Event
        • Schema.org – JobPosting
        • Schema.org – Organization
        • Schema.org – Person
        • Schema.org – Recipe

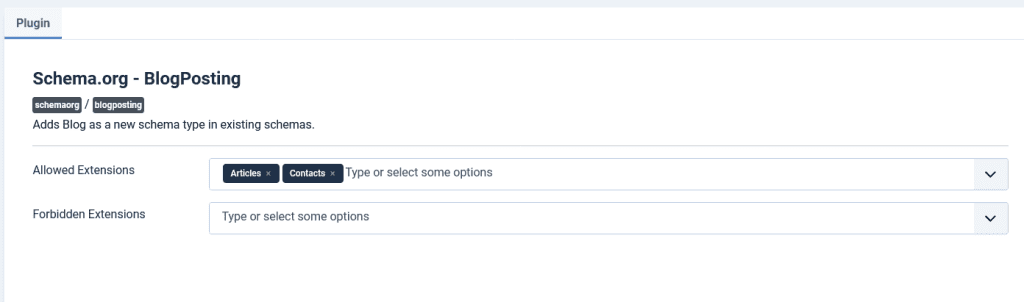
        These plugins excluding the System – Schema.org have the same configuration as shown in the screenshot.

        schema plugin options

        The plugins have two options.

        • Allowed Extensions: If you specify certain extensions (components) here, then the schema integration will only be applied to those selected extensions. For instance, if you only want the “BlogPosting” schema to be applied to articles from the “Content” component and not to other components like “Events” or “Products”, you can select the “Content” extension in the “Allowed Extensions” dropdown.
        • Forbidden Extensions: This is the opposite of “Allowed Extensions”. Any extension you select here will be excluded from schema integration, regardless of what’s chosen in the “Allowed Extensions”. For example, even if you’ve allowed the “Content” extension in the previous setting, but then you add it to the “Forbidden Extensions”, the schema will not be applied to the “Content” component.

        If you’re not in the mood to dive deep into configurations, just let it be.

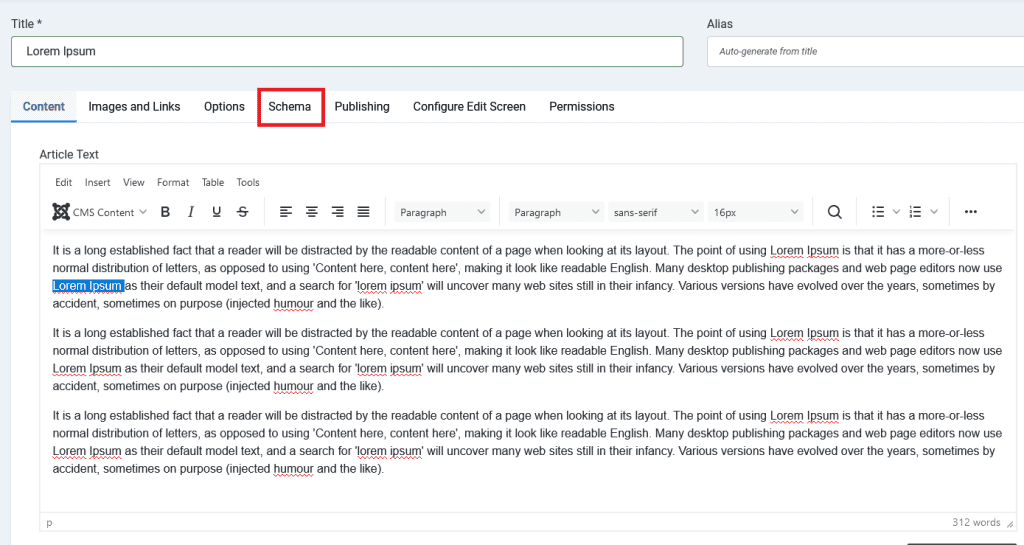
        Now, lets start setting up the schema for a Joomla article. To do that open a existing Joomla article or create a new article. You will now find a new tab called “Schema” in the edit article page.

        joomla article schema

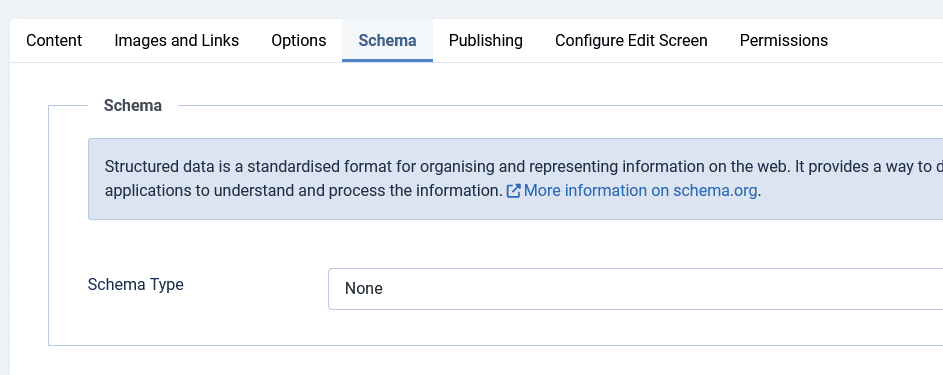
        Click on the Schema Tab to start setting up the Schema for the particular article. You will find the Schema Type Set to None. Lets understand the different type of schema and start configuring.

        schema type joomla article

        Types of Schema Supported in Joomla 5

        As I have mentioned that Joomla 5 supports 7 different type of Schemas. Lets discuss all the schema and its attributes one by one.

        BlogPosting

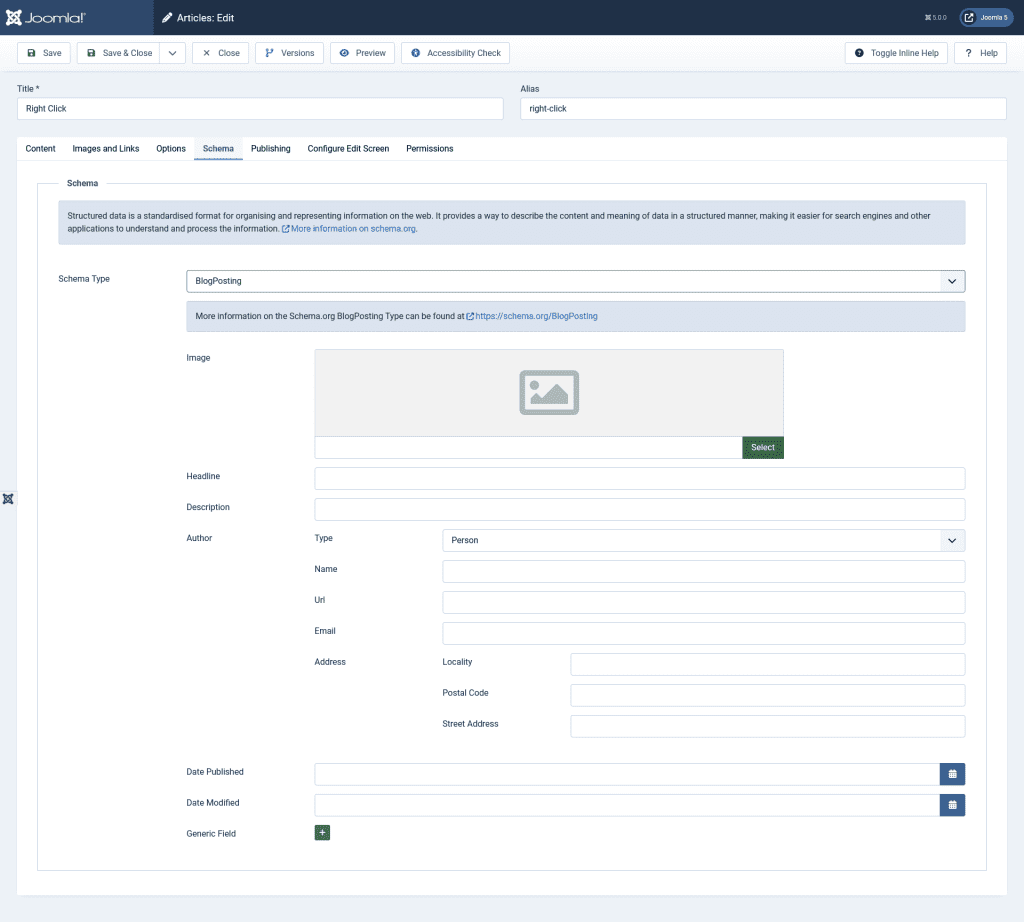
        blog posting schema joomla5

        When you select “BlogPosting” for the Schema Type in Joomla 5, it provides a series of fields tailored to the attributes commonly associated with blog posts. Here’s a breakdown of what each section represents:

        1. Image: This allows you to select an image that represents the blog post. This image will be used in structured data, which can be displayed in rich results on search engines.
        2. Headline: This should be the main title or headline of your blog post.
        3. Description: A brief summary or overview of what the blog post is about.
        4. Author: This section provides fields related to the author of the blog post:
          • Type: The type of entity the author is, commonly set to “Person”. There might be other options like “Organization” depending on your Joomla setup.
          • Name: The name of the author.
          • Url: A link to the author’s personal website or profile page.
          • Email: The author’s email address.
          • Address: If necessary, you can provide location details of the author, including:
            • Locality: City or region.
            • Postal Code: Postal or ZIP code.
            • Street Address: Exact street address.
        5. Date Published: The date when the blog post was first published.
        6. Date Modified: The date when the blog post was last updated or modified.
        7. Generic Field: This could be a customizable field where you can add additional structured data attributes that might not be covered by the default options.

        Book

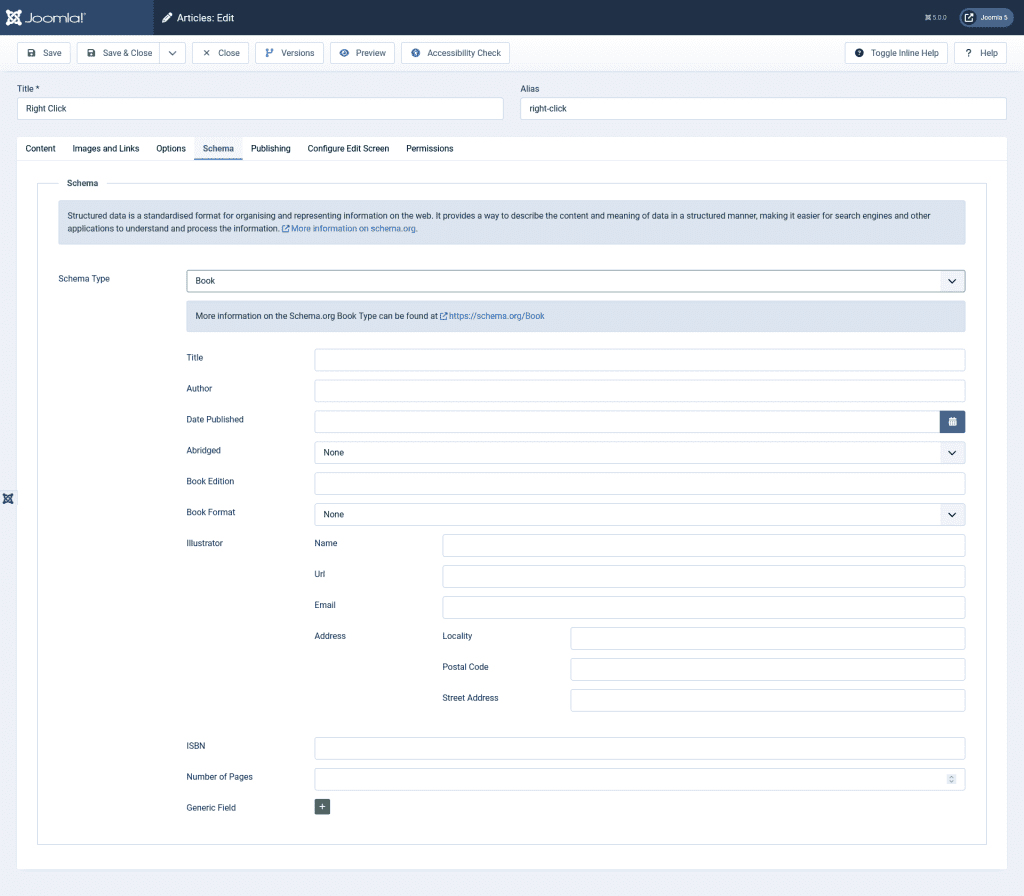
        book schema joomla5

        Upon Selecting “Book” for the Schema Type in Joomla 5, it provides the following set of fields tailored to the attributes commonly associated with books. The details are as follows.

        1. Title: The title of the book.
        2. Author: The name of the book’s author. You can provide additional details like URL, email, and address for the author as well, similar to the “BlogPosting” schema.
        3. Date Published: The date the book was published.
        4. Abridged: An option to specify whether the book is an abridged version or not. Abridged books are shortened versions, often cutting out non-essential parts to make the content more concise.
        5. Book Edition: Details about the specific edition of the book, if applicable. For example, “2nd Edition” or “Revised Edition”.
        6. Book Format: The format in which the book is available. This could be options like “Hardcover”, “Paperback”, “eBook”, etc.
        7. Illustrator: If the book contains illustrations, this section allows you to provide details about the illustrator, similar to the author details. This includes:
          • Name: The illustrator’s name.
          • Url: A link to the illustrator’s website or profile.
          • Email: The illustrator’s email address.
          • Address: Location details of the illustrator:
            • Locality: City or region.
            • Postal Code: Postal or ZIP code.
            • Street Address: Exact street address.
        8. ISBN: The International Standard Book Number, a unique identifier for books.
        9. Number of Pages: The total number of pages in the book.
        10. Generic Field: Like in the “BlogPosting” schema, this is a customizable field where you can add any additional structured data attributes related to the book that might not be covered by the default options.

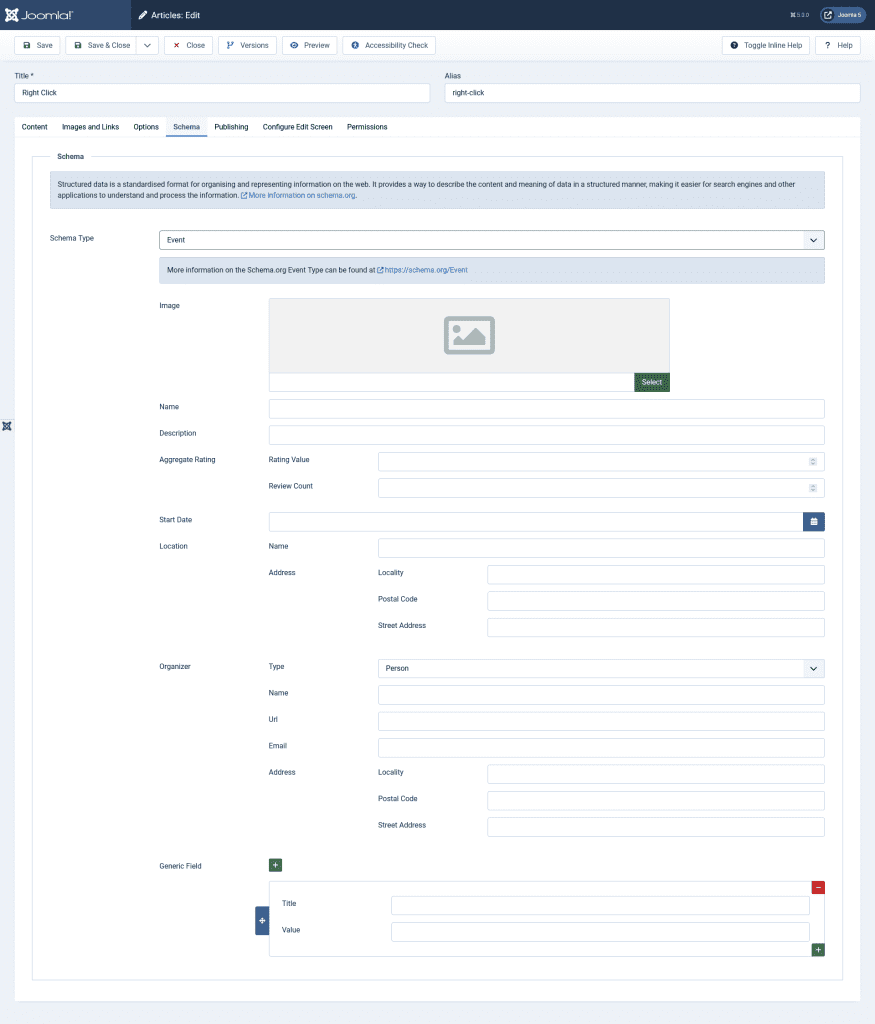
        Event

        event schema joomla5

        Event” for the Schema Type in Joomla 5 provides a set of fields designed to capture information related to events. Here’s a breakdown of the fields provided:

        1. Image: A field where you can upload or select an image that represents the event.
        2. Name: The official name or title of the event.
        3. Description: A brief overview or summary of the event.
        4. Aggregate Rating: This section is for the overall rating or feedback given to the event, if applicable.
          • Rating Value: The average rating value.
          • Review Count: The number of reviews or ratings the event has received.
        5. Start Date: The commencement date and time of the event.
        6. Location: The venue or place where the event is scheduled to take place.
          • Name: The name of the location or venue.
          • Address: The address details of the location, which include:
            • Locality: City or region.
            • Postal Code: Postal or ZIP code.
            • Street Address: Exact street address.
        7. Organizer: Information about the individual or organization responsible for organizing the event.
          • Type: Whether the organizer is a person, organization, or another entity type.
          • Name: The name of the organizer.
          • Url: A link to the organizer’s website or profile.
          • Email: Contact email for the organizer.
          • Address: Location details of the organizer, similar to the location address fields.
        8. Generic Field: A customizable field where you can add any additional structured data attributes related to the event that might not be included in the default options. This section consists of a “Title” and “Value” pair.

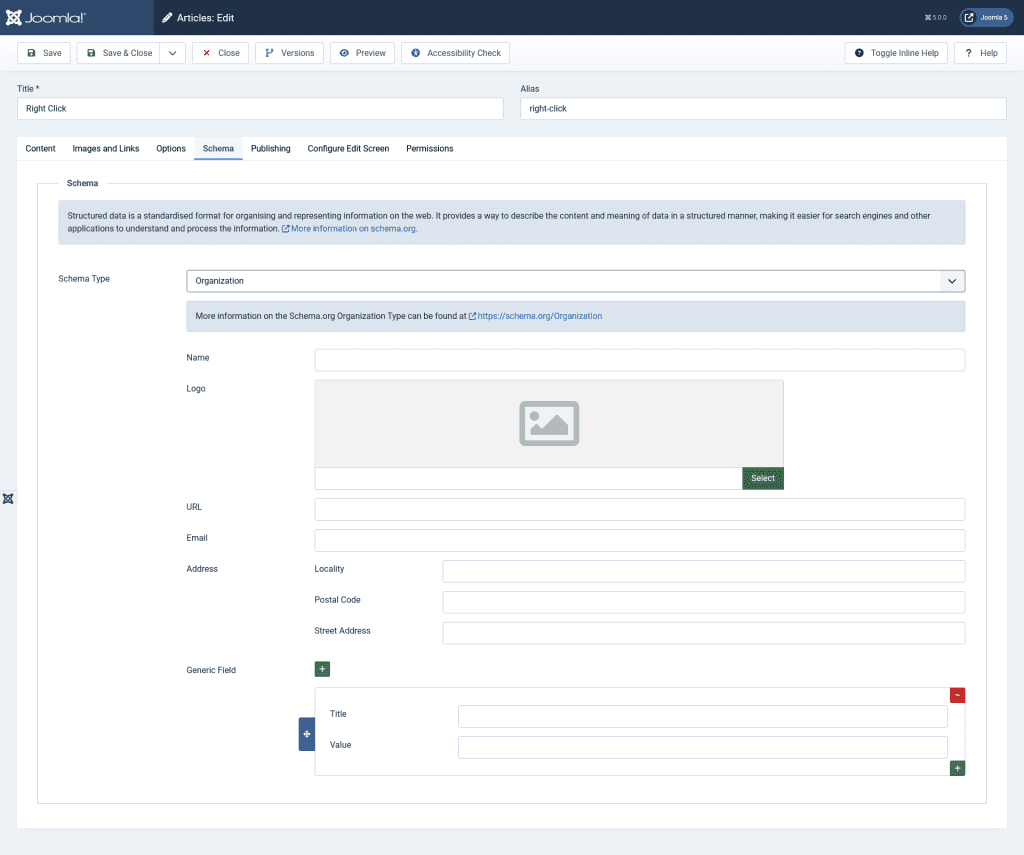
        Organization

        organization schema joomla5

        Organization” for the Schema Type in Joomla 5, it provides a set of fields tailored to capture information related to organizations. Here’s a detailed description of the fields you see:

        1. Name: The official name of the organization.
        2. Logo: A field to upload or select the organization’s logo, providing a visual representation of the entity.
        3. URL: The official website URL or main online presence of the organization.
        4. Email: The primary contact email for the organization.
        5. Address: The physical address of the organization, broken down into:
          • Locality: The city or locality where the organization is situated.
          • Postal Code: The postal or ZIP code for the location.
          • Street Address: The detailed street address of the organization.
        6. Generic Field: A customizable section to accommodate any additional structured data attributes related to the organization that might not fit into the predefined categories. This section provides a “Title” and “Value” pair for custom entries.

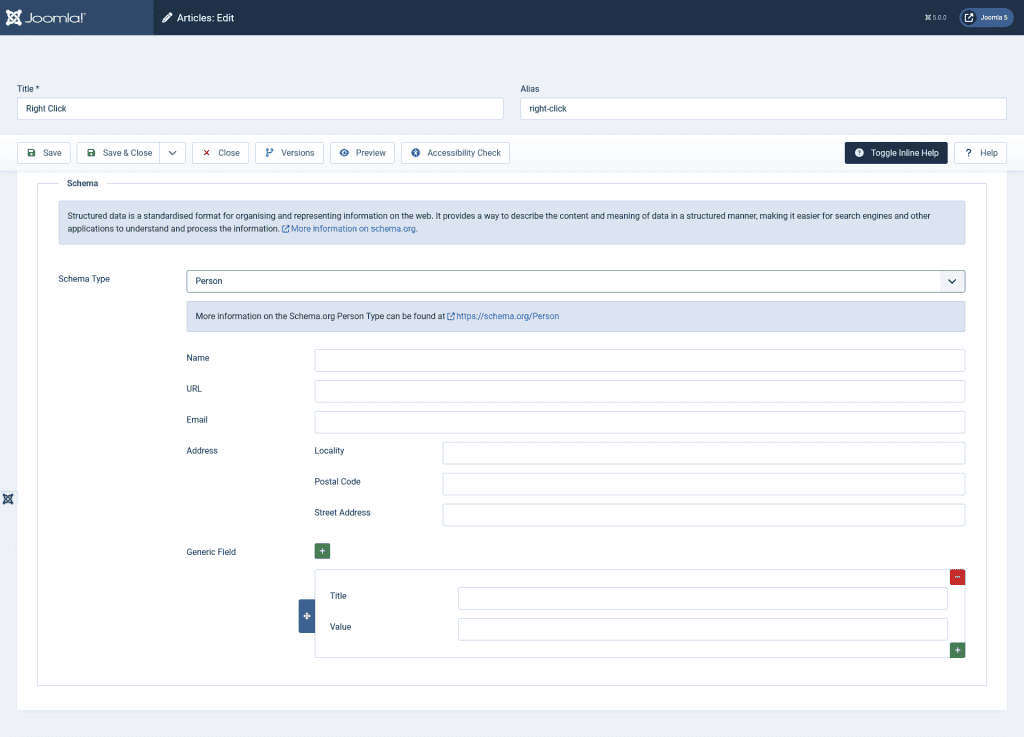
        Person

        person schema joomla5
        1. Name: The full name of the person.
        2. URL: The personal website or main online presence of the individual, such as a blog or portfolio.
        3. Email: The primary contact email for the person.
        4. Address: The physical residence or contact address of the person, further broken down into:
          • Locality: The city or locality where the person resides.
          • Postal Code: The postal or ZIP code for the location.
          • Street Address: The detailed street address.
        5. Generic Field: This is a flexible section that allows you to include any additional structured data attributes related to the person that might not fit into the predefined categories. You can enter a custom “Title” and its corresponding “Value” in this section.

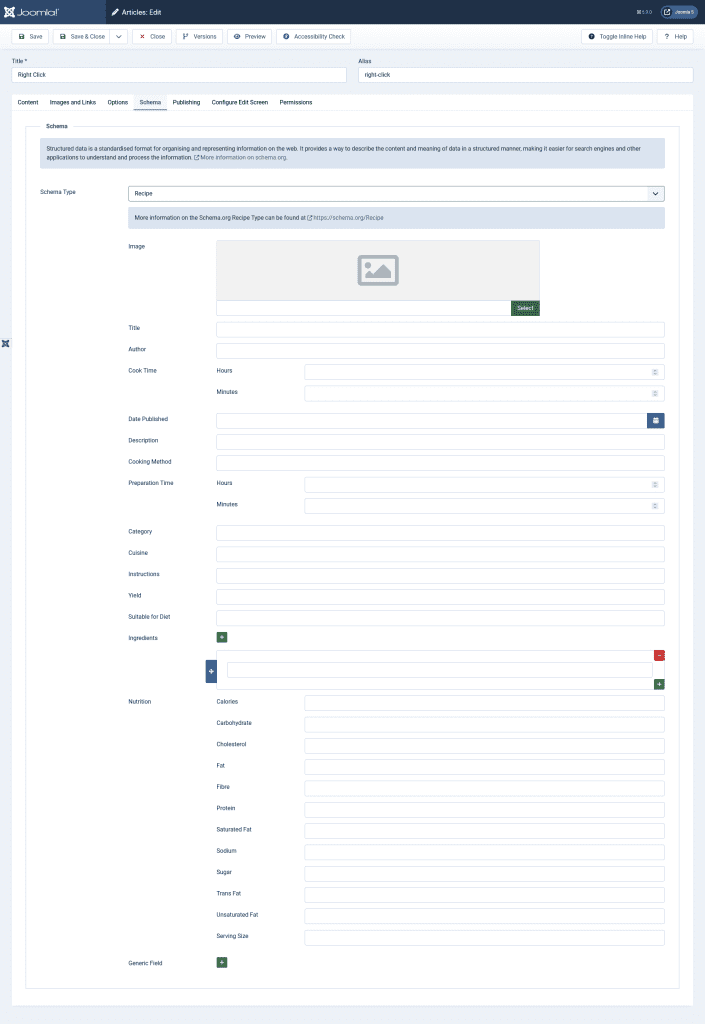
        Recipe

        recipe schema joomla5

        Recipe Schema Type within Joomla 5 allows you to input structured data specifically tailored for recipes. Here’s an overview of the fields provided:

        1. Image: This is where you can upload or link to an image representing the recipe.
        2. Title: The name of the recipe.
        3. Author: The individual or entity that created or is credited with the recipe.
        4. Cook Time: The time it takes to cook the dish. You can specify the duration in hours and minutes.
        5. Date Published: The date on which this recipe was originally published.
        6. Description: A brief overview or summary of the recipe.
        7. Cooking Method: The technique used for cooking the dish (e.g., baking, frying, steaming).
        8. Preparation Time: The amount of time it takes to prepare the ingredients and the dish before cooking. Again, you can specify the duration in hours and minutes.
        9. Category: The type or classification of the dish (e.g., dessert, main course, appetizer).
        10. Cuisine: The culinary style or tradition the recipe belongs to (e.g., Italian, Chinese, American).
        11. Instructions: Step-by-step directions on how to prepare and cook the dish.
        12. Yield: The quantity or servings the recipe produces.
        13. Suitable for Diet: Any specific dietary considerations the recipe adheres to (e.g., vegan, gluten-free).
        14. Ingredients: A list of all the ingredients required for the recipe.
        15. Nutrition: Detailed nutritional information about the dish, including:
          • Calories
          • Carbohydrate
          • Cholesterol
          • Fat
          • Fibre
          • Protein
          • Saturated Fat
          • Sodium
          • Sugar
          • Trans Fat
          • Unsaturated Fat
          • Serving Size
        16. Generic Field: Similar to the person schema, this flexible section lets you include any additional structured data attributes related to the recipe not covered by the predefined categories.

        JobPosting

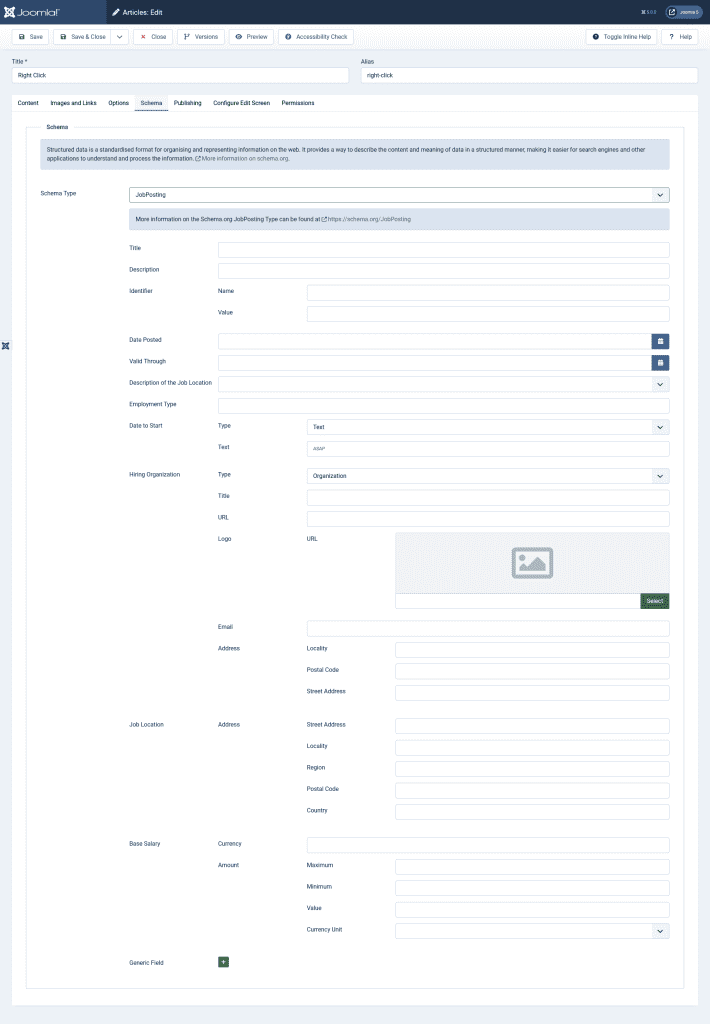
        jobposting schema joomla5

        The “JobPosting” Schema Type within Joomla 5 allows you to input structured data tailored for job listings. This helps search engines to better interpret and display content related to job postings. Here’s an overview of the fields provided:

        1. Title: The title or name of the job position being advertised.
        2. Description: A brief overview or summary of the job position, its responsibilities, and other key details.
        3. Identifier: This section allows you to input a unique identifier for the job posting, with both a “Name” for the type of identifier and a “Value” for the actual identifying information.
        4. Date Posted: The date the job listing was originally published.
        5. Valid Through: The expiration date of the job listing after which it may no longer be valid.
        6. Description of the Job Location: Additional details about the job location.
        7. Employment Type: The nature of the job in terms of its duration or commitment (e.g., Full-Time, Part-Time, Contract).
        8. Date to Start: The date on which the selected candidate is expected to commence their duties.
        9. Hiring Organization: Information about the organization hiring for the position:
          • Type: Specifies that it’s an organization.
          • Title: The name of the organization.
          • URL: A link to the organization’s website.
          • Logo: A link or upload area for the organization’s logo.
        10. Email: The contact email address related to the job listing.
        11. Address: This section captures detailed address information for the hiring organization, including:
          • Locality: City or town.
          • Postal Code: ZIP or postal code.
          • Street Address: The exact street address of the organization.
        12. Job Location: Information about where the job will be based, similar to the address fields mentioned above but specific to the job’s location.
        13. Base Salary: Details about the salary offered for the position:
          • Currency: The currency in which the salary is offered.
          • Amount: Specific details about the salary amount, with fields for the maximum, minimum, and a specific value. There’s also an option to specify the unit of the salary, such as per hour, per month, etc.
        14. Generic Field: This flexible section lets you include any additional structured data attributes related to the job posting not covered by the predefined categories.

        Now that you have learnt integrating the schema plugin, time to test it.

        Testing the schema Markup

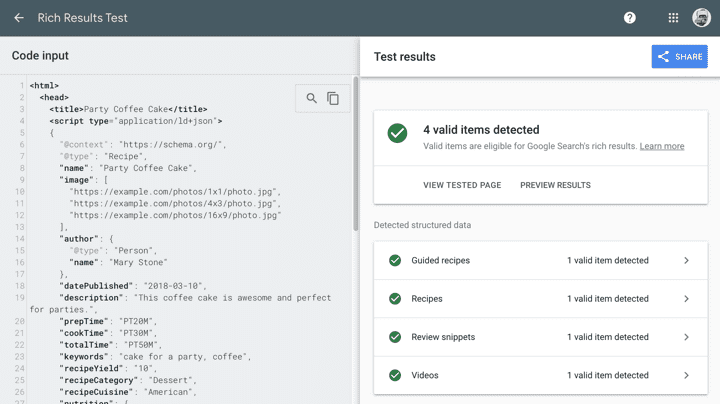
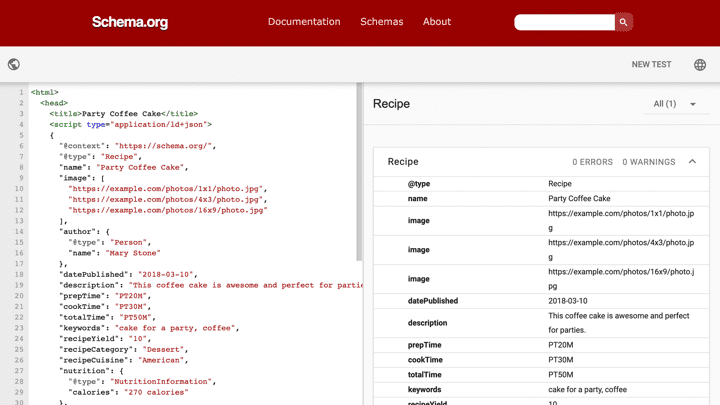
        rich results test 720

        Follow these steps, and you’ll be good to go:

        1. Grab Your URL: First things first, copy the URL of the page you want to test.
        2. Head to the Testing Tool: Visit Google’s Rich Results Test or Schema Markup Validator
        3. Paste & Run: Drop your URL into the search bar and hit ‘Test URL’.
        4. Review the Results: Once the test runs, you’ll see if your markup is valid or if there are any issues you need to tackle.
        schema markup validator 720

        Absolutely! Let’s break it down in a style reminiscent of Neil Patel:

        Schema.org vs. Rich Snippets: What’s the difference?

        Alright, here’s the thing. When you’re diving deep into the SEO world, you’ll come across terms like Schema.org and Rich Snippets. At first glance, they might seem like the same thing, but they play distinct roles in the SEO game. Let’s demystify this:

        Schema.org:

        • What Is It? Think of Schema.org as a library. It’s a standardized collection of schemas, or, in simpler terms, a set of codes you can add to your website. This code helps search engines understand your content better. It’s like giving them a guidebook to your site.
        • Why Use It? By implementing Schema.org markup, you’re giving search engines a clearer picture of what’s on your page. Whether it’s a recipe, product, or event, you’re spelling it out.

        Rich Snippets:

        • What Is It? Rich Snippets are the visual result of using that Schema.org markup. When you search something on Google, sometimes you see results with star ratings, images, or product prices. Those are Rich Snippets in action!
        • Why Use Them? They make your search result stand out! It’s like putting on a fancy outfit for a party. You get more clicks, better engagement, and, ultimately, higher traffic.

        In a Nutshell: Schema.org is the behind-the-scenes code, while Rich Snippets are the front-and-center stars of the show in search results.

        Wrapping It Up

        Joomla 5’s Rich Snippets isn’t just an update; it’s a revolution. It streamlines structured data optimization, paving the way for a stellar search experience. Expect a surge in your site’s traffic and engagement. So, if you’re all about amplifying your online clout, it’s time to harness the might of Rich Snippets in Joomla 5. Let’s elevate your website game!

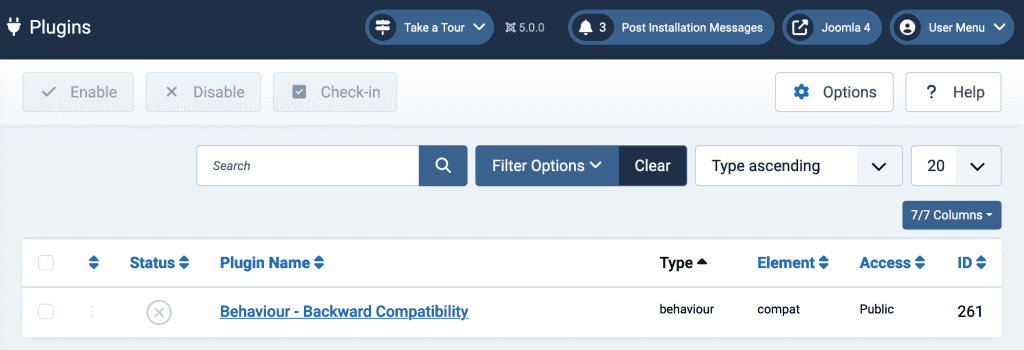
      7. Behaviour – Backward Compatibility Plugin for Joomla: A Complete Guide

        Behaviour – Backward Compatibility Plugin for Joomla: A Complete Guide

        With Joomla 5.0, the developers introduced an essential plugin to enhance backward compatibility between versions 5 and 4. This plugin, implemented as the “Behaviour” type, ensures it loads before any other plugins. Such prioritization ensures that core functionalities relying on older code structures aren’t disrupted as new updates roll out.

        Note: Although the plugin is of the “Behaviour” type, developers should exercise caution when creating new plugins of this type. Future Joomla versions might phase out this group, making it obsolete.

        The Three Pillars: Plugin Options

        The compatibility plugin comes with three distinct options that super users can activate:

        • The first option deals with class aliases, some of which have roots in Joomla 1.0. While they’ve been getting deprecated and replaced since Joomla 3.3, this option ensures that older extensions relying on them don’t break.
        • The second and third options relate more to legacy web assets. For most use-cases, these can be safely disabled without causing disruptions.

        After migrating from Joomla 4.4 to 5.x, the plugin is automatically enabled, with all options active. This automatic activation also extends to new installations of Joomla 5.0 and possibly later versions.

        Purpose and Long-Term Vision

        The primary goal of this plugin is twofold:

        1. Facilitate a seamless transition from Joomla 4.4 to 5.
        2. Allow the installation of non-updated Joomla extensions in Joomla 5.

        This strategy grants developers an additional two years to align old code with current standards. However, it’s essential to note that Joomla 6 plans to remove deprecated code, emphasizing the temporary nature of this plugin.

        Performance Implications

        While the plugin serves a noble purpose, it does come with a minor drawback: added page load times. This increase in load time is due to the additional code the plugin introduces to ensure compatibility.

        What if we disable the Behaviour – Backward Compatibility Plugin?

        Behaviour Backward Compatibility

        If you disable the Behaviour – Backward Compatibility Plugin in Joomla, several things can happen, based on the information provided:

        1. Loss of Class Aliases Support: The first option of the plugin deals with class aliases. These are older class names that have been renamed in newer Joomla versions but are kept for backward compatibility. If your site or any extensions on your site rely on these old class names, disabling the plugin can cause those parts of the site to break or malfunction.
        2. Legacy Web Assets: The second and third options of the plugin deal with legacy web assets. If any extension on your site relies on these legacy web assets, there could be potential disruptions. However, based on the provided information, it’s mentioned that it’s relatively safe to disable these options as it’s unlikely for extensions to load a legacy web asset directly.
        3. Extension Compatibility Issues: Extensions that haven’t been updated for Joomla 5 might rely on deprecated features that the compatibility plugin supports. Disabling the plugin could result in these extensions malfunctioning or causing errors on your site.
        4. Performance Improvements: On the upside, since the plugin loads additional code to ensure compatibility, disabling it might result in a slight improvement in page load times. This could lead to a faster website experience for your users.
        5. Future-Proofing: If you can successfully run your website with the plugin disabled, it suggests that your site and extensions are more in line with the newer standards of Joomla. This is beneficial as you prepare for future Joomla versions, especially considering that Joomla 6 plans to remove deprecated code.

        Recommendations:

        Before disabling the plugin:

        • Backup: Always ensure you have a recent backup of your website. This allows you to restore your site if something goes wrong.
        • Test in a Staging Environment: If possible, test the changes in a staging or development environment first. This way, you can see the effects without impacting your live site.
        • Monitor After Disabling: After you’ve disabled the plugin, thoroughly test all aspects of your site to ensure everything is working as expected.

        While the Behaviour – Backward Compatibility Plugin provides a bridge for older extensions and functionalities, it’s crucial to ensure that your site and its extensions evolve with Joomla’s changes. If you decide to disable it, do so with caution and preparation.

        Final Thoughts and Recommendations

        Transition periods in software development can often be tumultuous. However, tools like the Behaviour – Backward Compatibility Plugin are a testament to Joomla’s commitment to its vast user base. Developers are urged to test their extensions with the compatibility plugin disabled, ensuring future-proofing their products.